The Logitech MX Master series of mice is a favorite among the Bolt team. They’re consistently rated as top of the pack among graphic designers, engineering design professionals and everyday users who are looking for a solid wireless mouse. While they aren’t ideal for gaming, they’re well-suited for pretty much everything else.
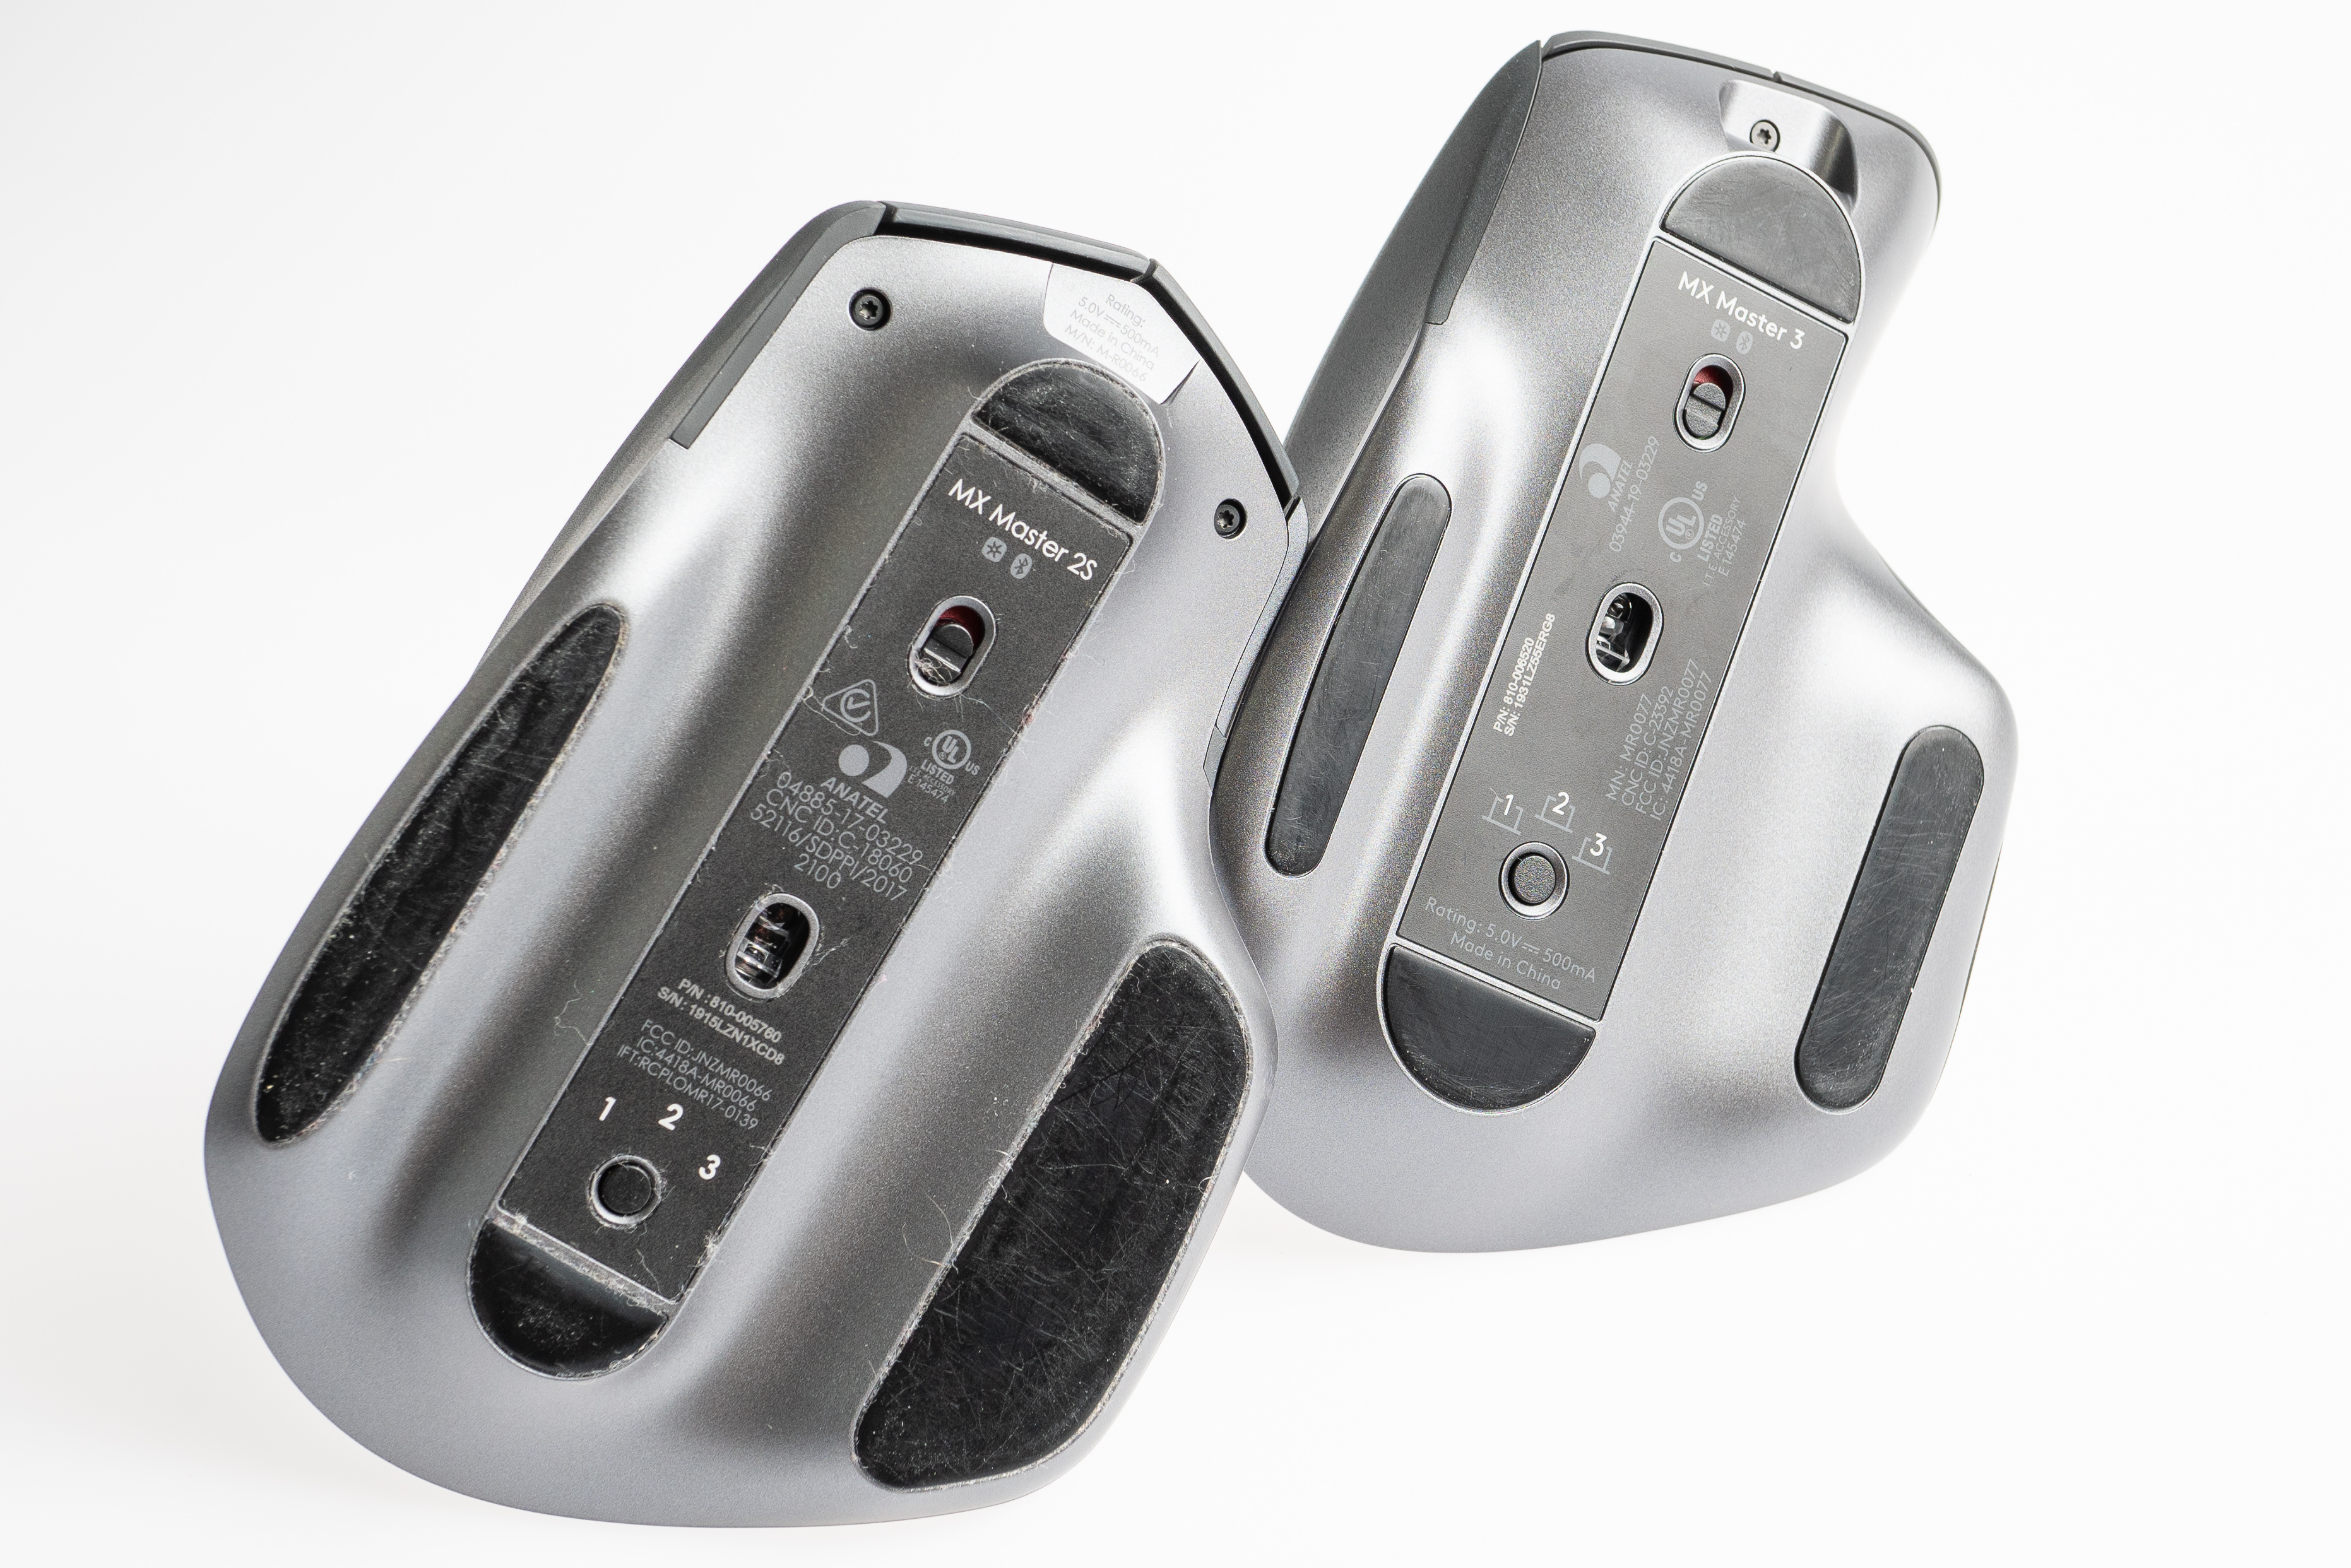
The series just got even better with the recent launch of the MX Master 3. We took one apart, side-by-side with a heavily-used MX Master 2S, to see what the Logitech team changed on the inside. This is unlike many other teardowns we’ve completed thanks to the incredible history of Logitech. It isn’t exactly their first rodeo, as they’ve been making mice for decades, so get excited to witness a masterclass in consumer product design.
Vast Experience in Product Design
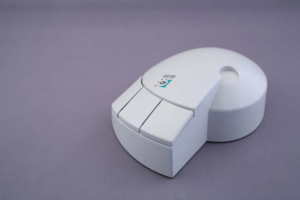
Logitech was founded in Switzerland in 1981 by two Stanford alumni and an engineer from Olivetti, the legendary Italian typewriter manufacturer. Prior to releasing the original MX Master in 2015, Logitech had already designed and launched over 100 different mouse products. It’s fascinating to look at the history of how their products have changed over time to accommodate evolving demand. By studying the MX Masters in particular, we can learn how they changed and improved the technology of a single series of products over three generations.
For any company developing the first generation of a product, the key is to move fast and minimize risk in order to get to market quickly, especially when including a new technology. It’s hard to devote time to finesse the details until later generations. The progression of the MX Master series is clear: it began with a new technology, the dual-mode scroll wheel, that has been refined over the last few years. The scroll wheel in the MX Master 3 is something that’s been beautifully massaged for this new generation.
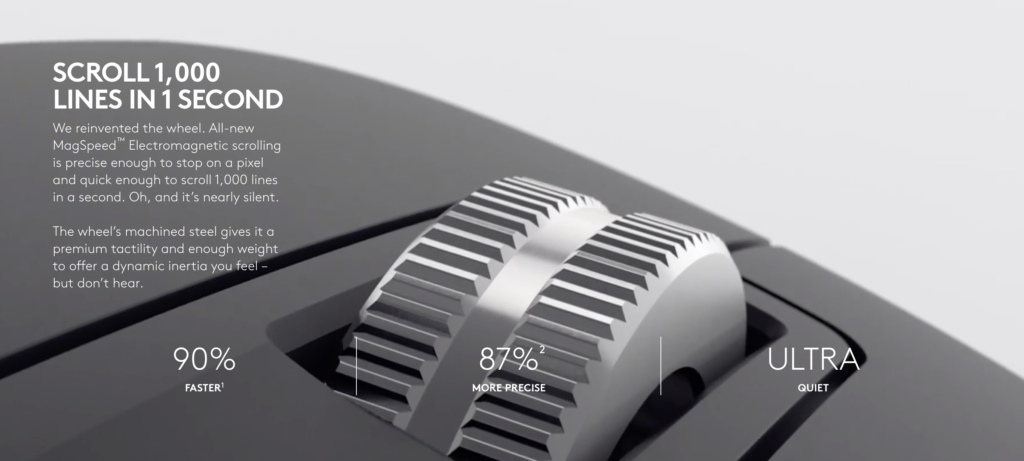
The marketing for the MX Master 3 calls out a few key improvements: the new scroll wheel, first and foremost, now uses a technology called “MagSpeed”. It also calls out newly improved ergonomics of the mouse with better hand feel and more appropriately-placed buttons. The last major change, and the least surprising to us, was the move to USB-C for fast charging. With the increasing scarcity of Micro USB connectors in consumer products and the direction the market is headed with USB-C adoption, it’s clear Logitech made the right choice here.
We love this mouse for more reasons, though: it feels great in the hand, has a nice number of buttons, and is quick to switch between up to three paired devices. It’s plenty precise for CAD work and is reliable over bluetooth. The most unique feature of the MX Master series, though, is the software-controlled scroll wheel that utilizes the “MagSpeed” technology: the mouse quickly switches between a typical ratcheting feel and a free-spinning mode for quickly scanning through long documents or websites based on how aggressively you scroll. We were most excited to see how this sweet scroll wheel changed for the third generation, and always appreciate seeing the incredible mechanical and electrical design that goes into high-volume consumer products. You may think that a few new features wouldn’t prompt many internal changes, but almost every single part is different. Let’s dive into some features of the MX Master 3 and examine the insides more closely to see what’s changed.
The Wheel: A Magnetic Marvel
The new scroll wheel can fly through “1,000 lines in 1 second”. It also claims to be “nearly silent”, which aims to improve one of our main complaints of the MX Master 2S–its noise. Just like its older sibling, the MX Master 3 can automatically switch from what we call “detent” mode to “free” mode with a quick flick of the wheel or with a press of the top center button. We were excited to see how they accomplished this on the inside, in both versions.
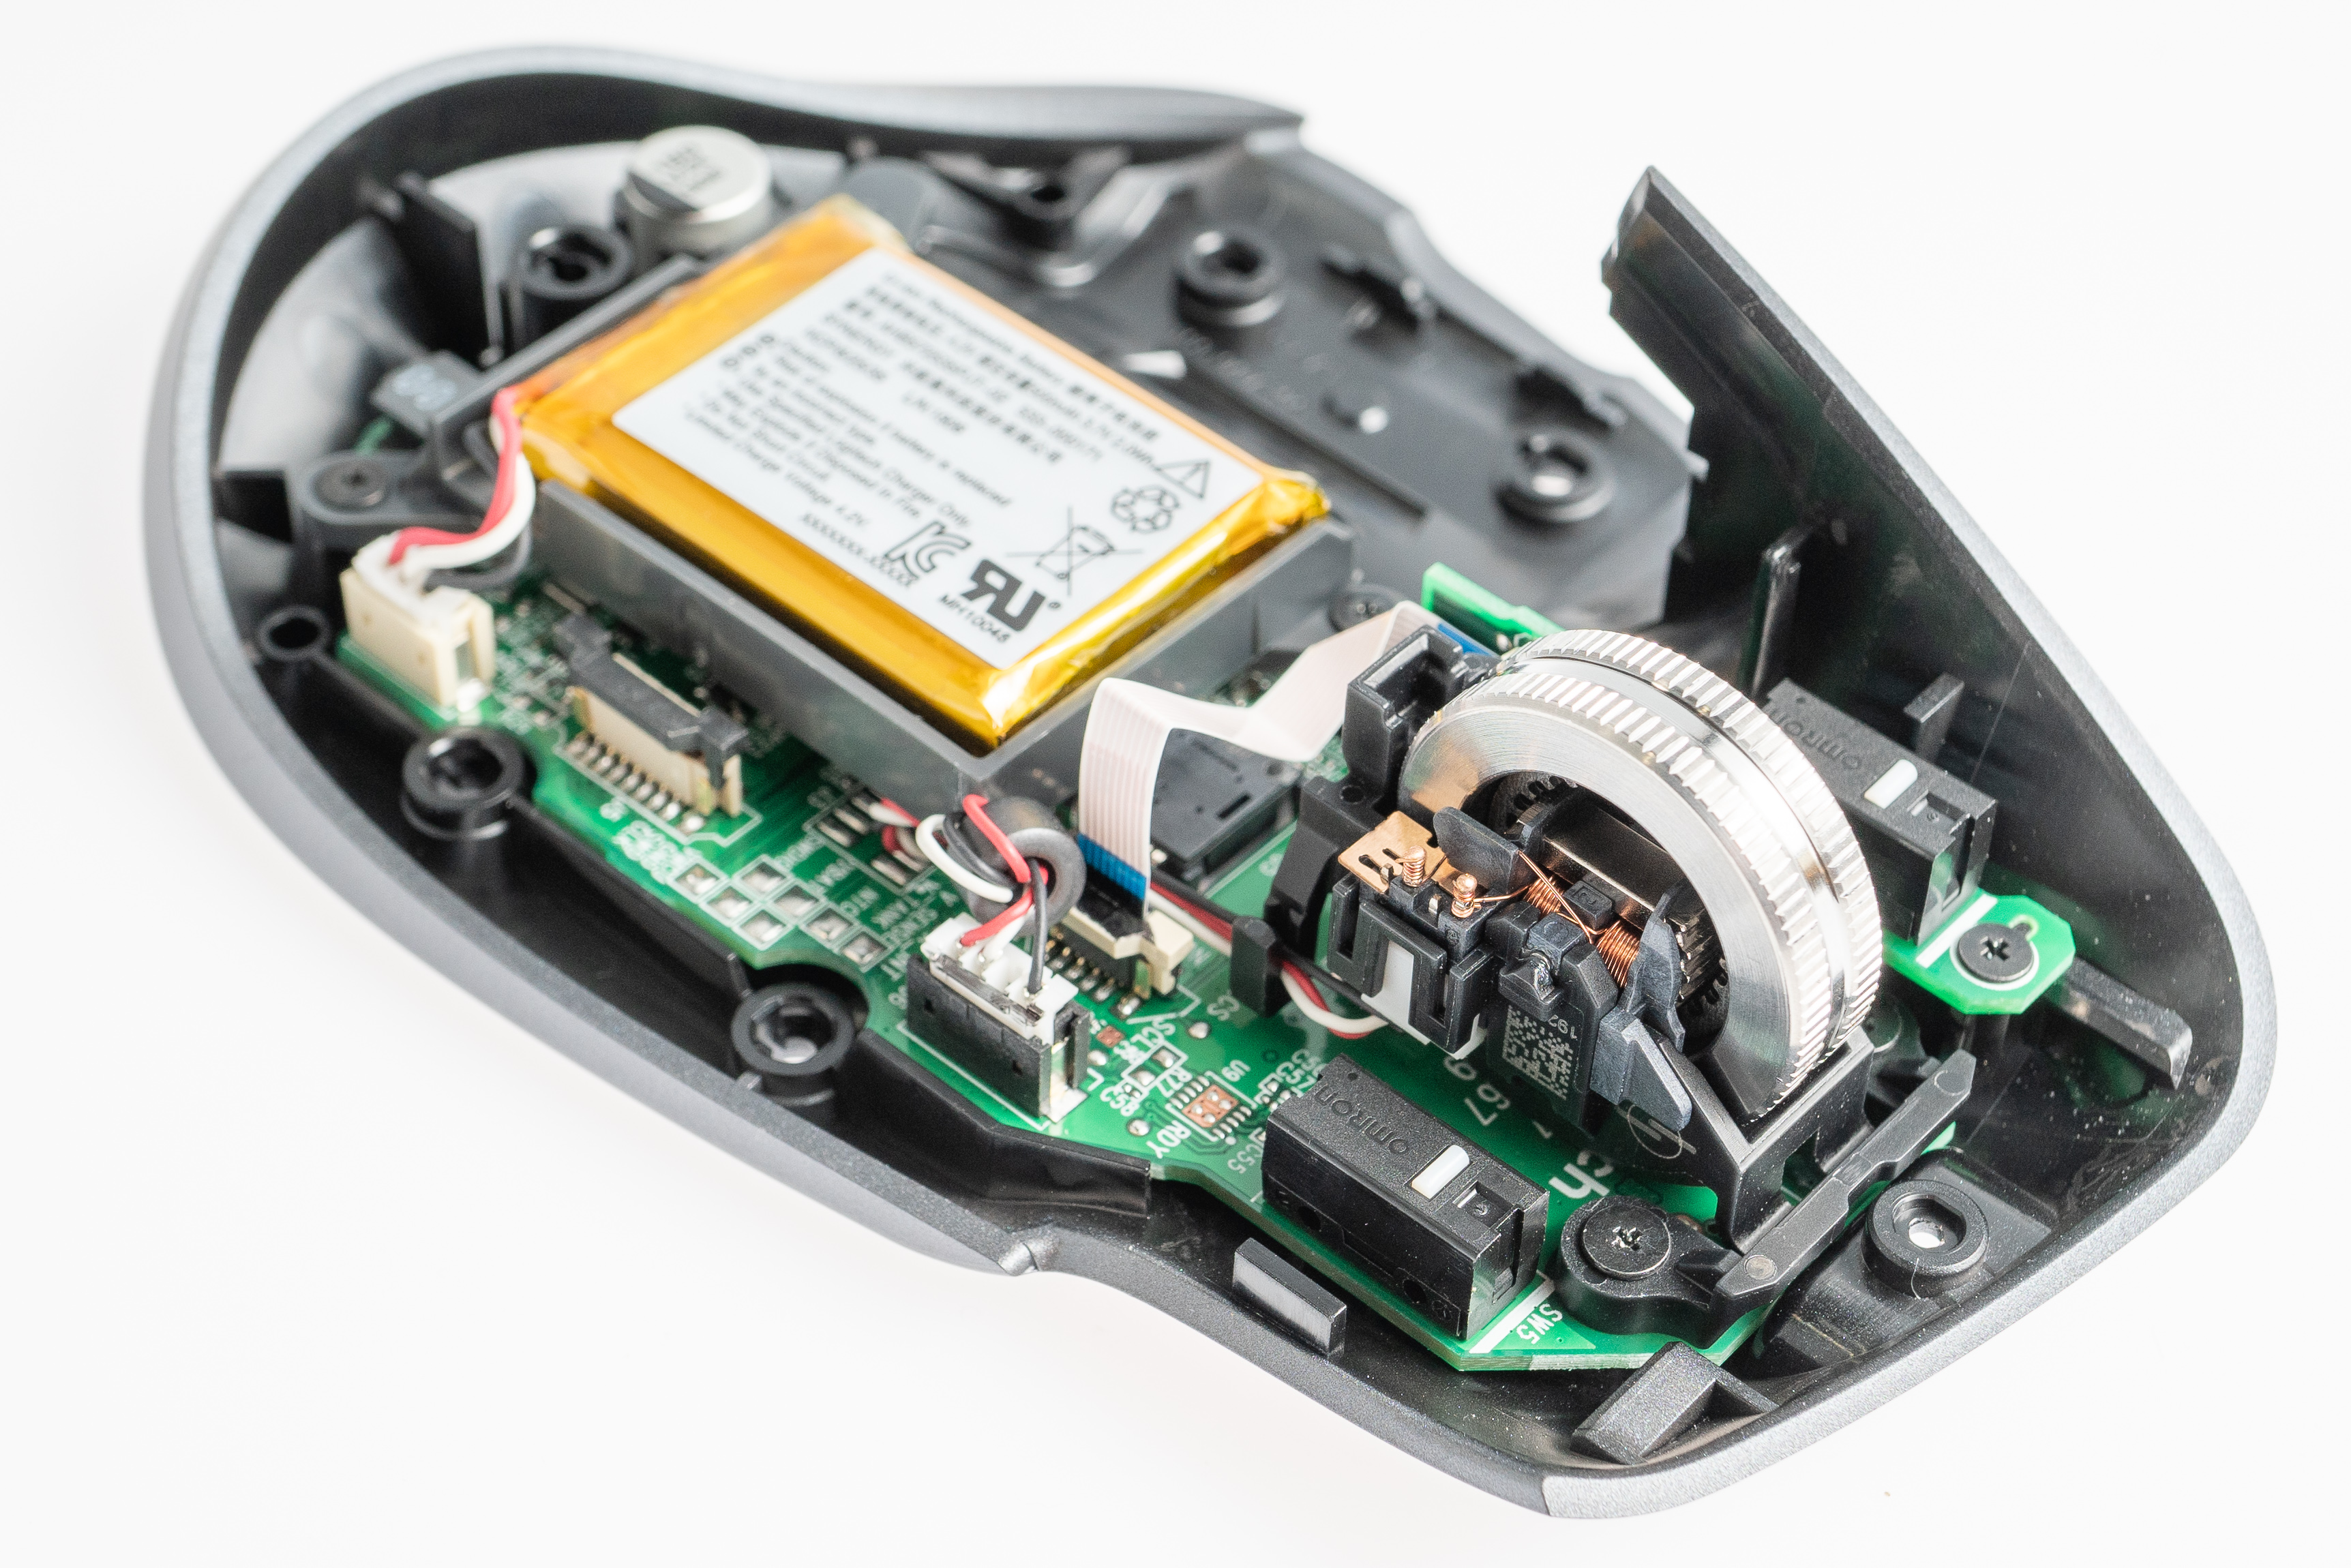
There’s a lot going on here. First, the wheel is an object that users interact with every day, so it better feel nice. Underneath the user-facing, high-touch object is an electromechanical element that enables the switchable modes. There’s also some sensing going on for detecting wheel speed and position, along with a pin and spring to support the whole shebang so you can click it! Whew.
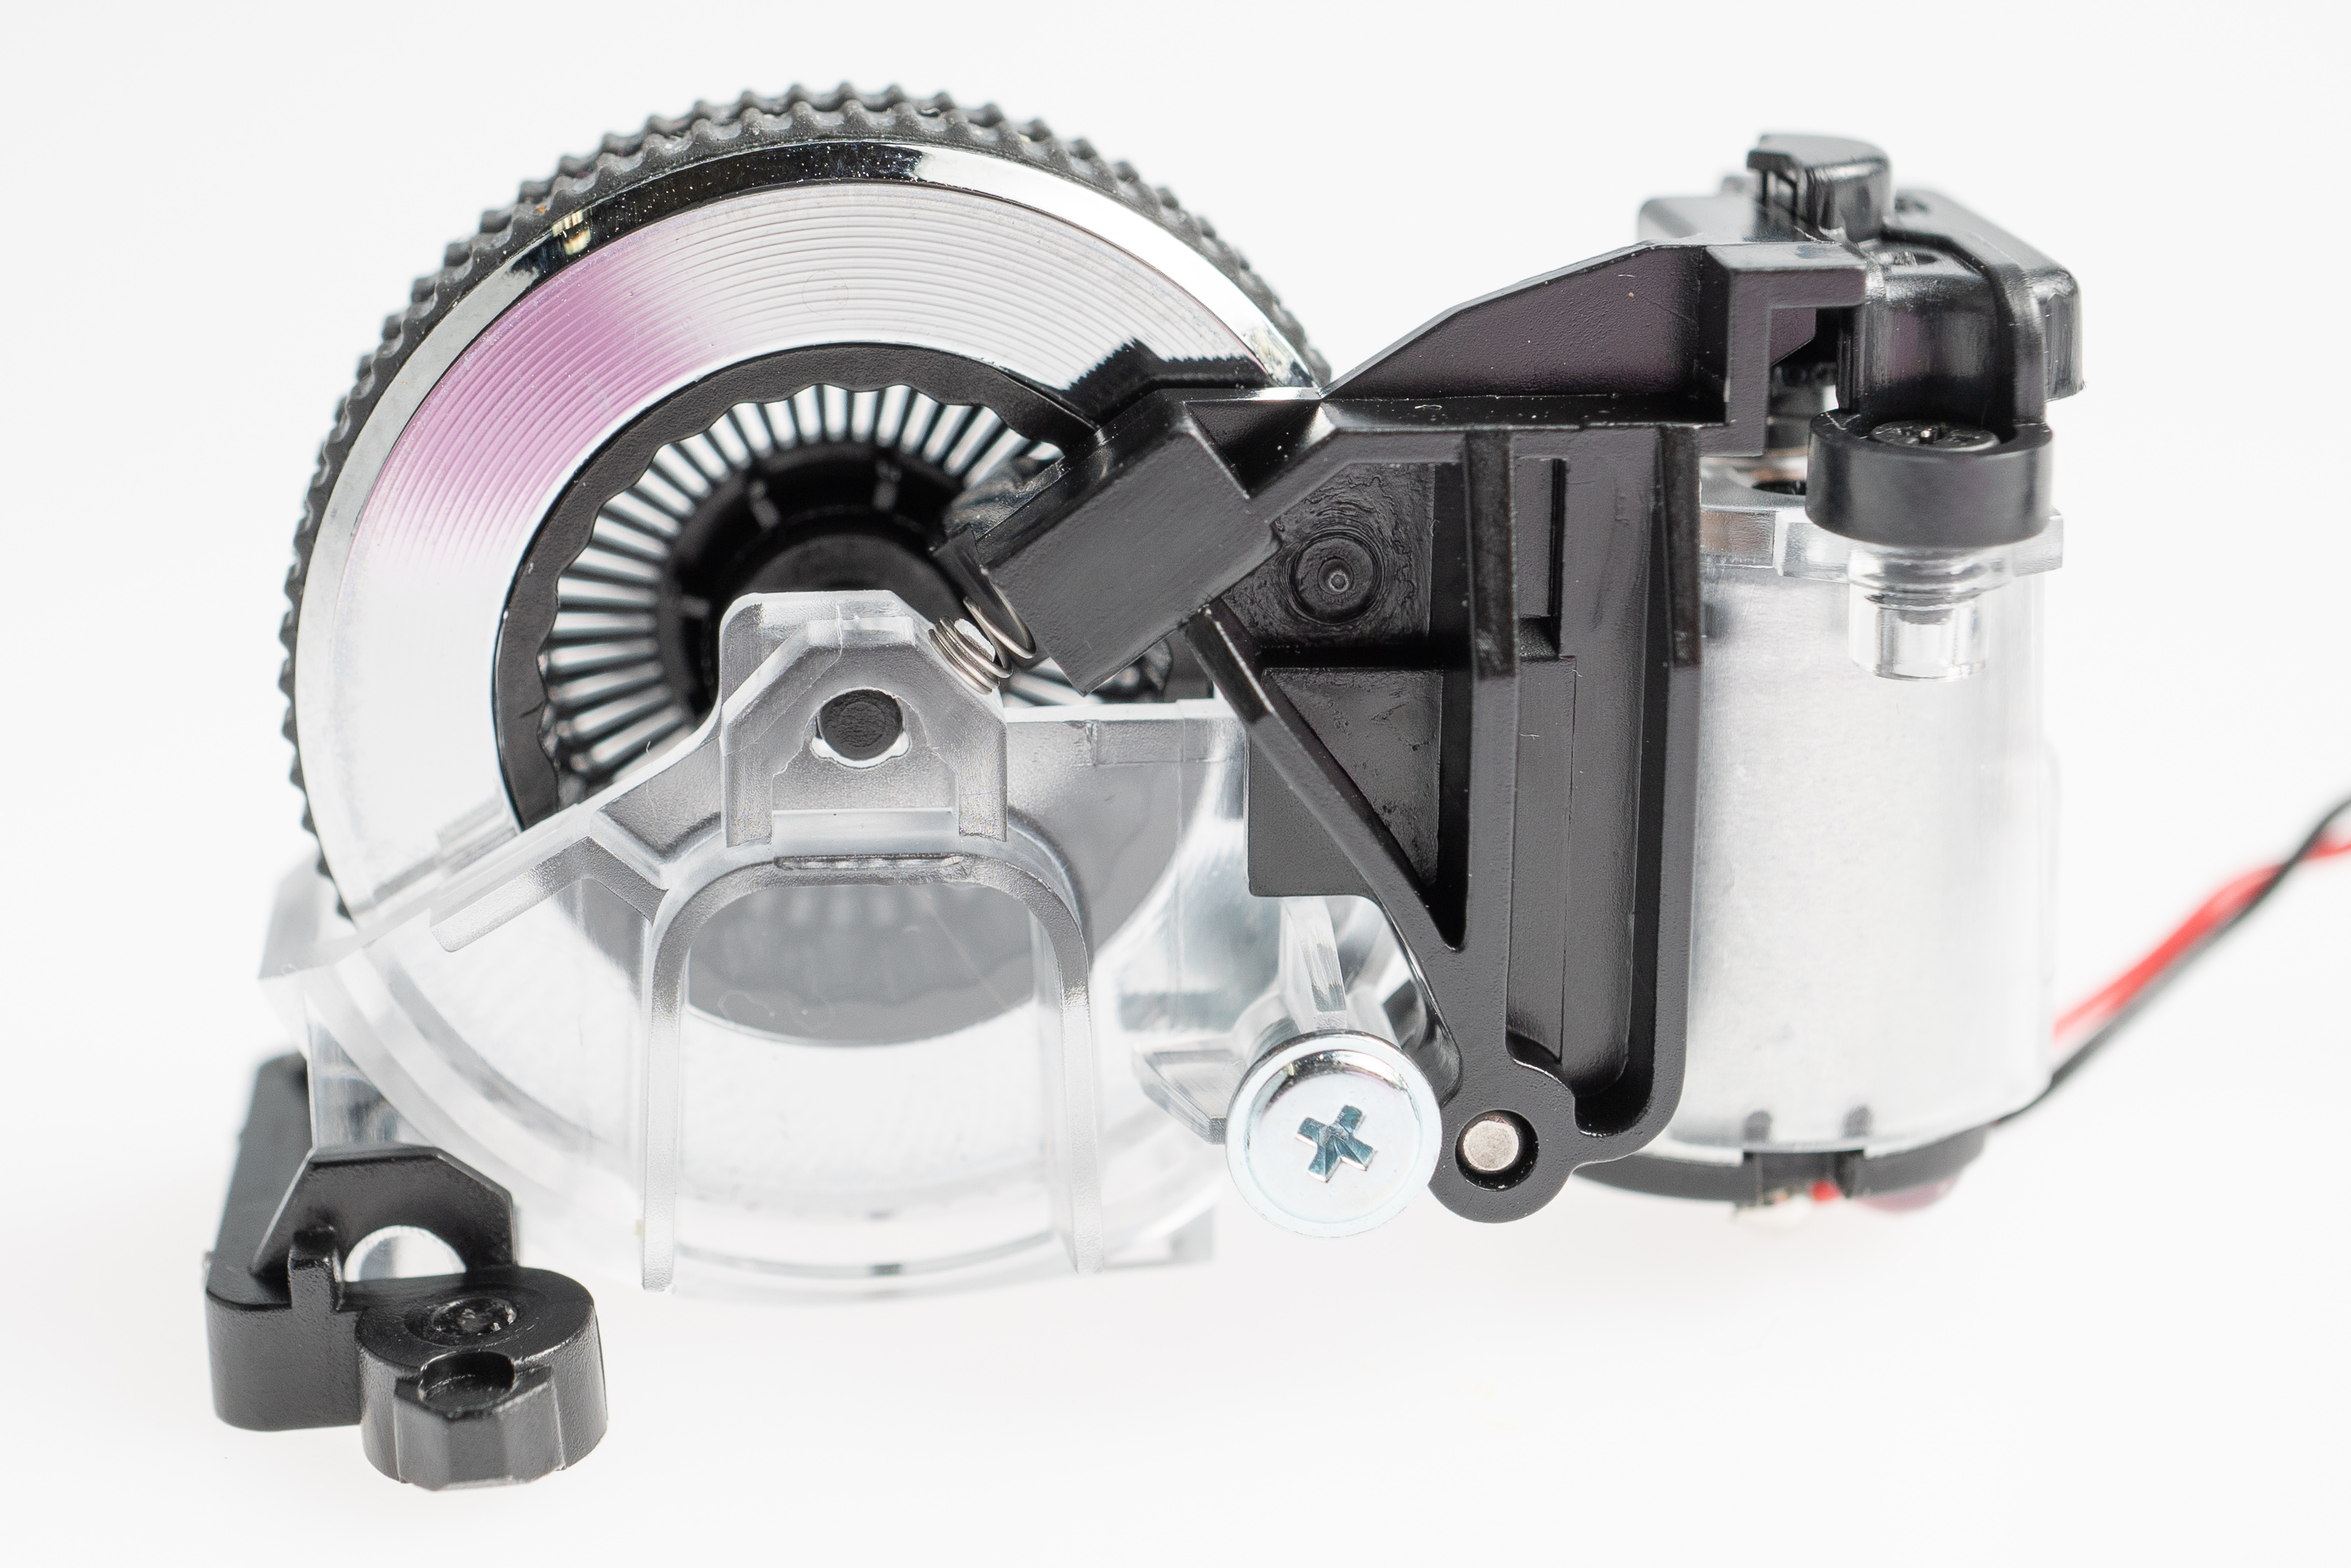
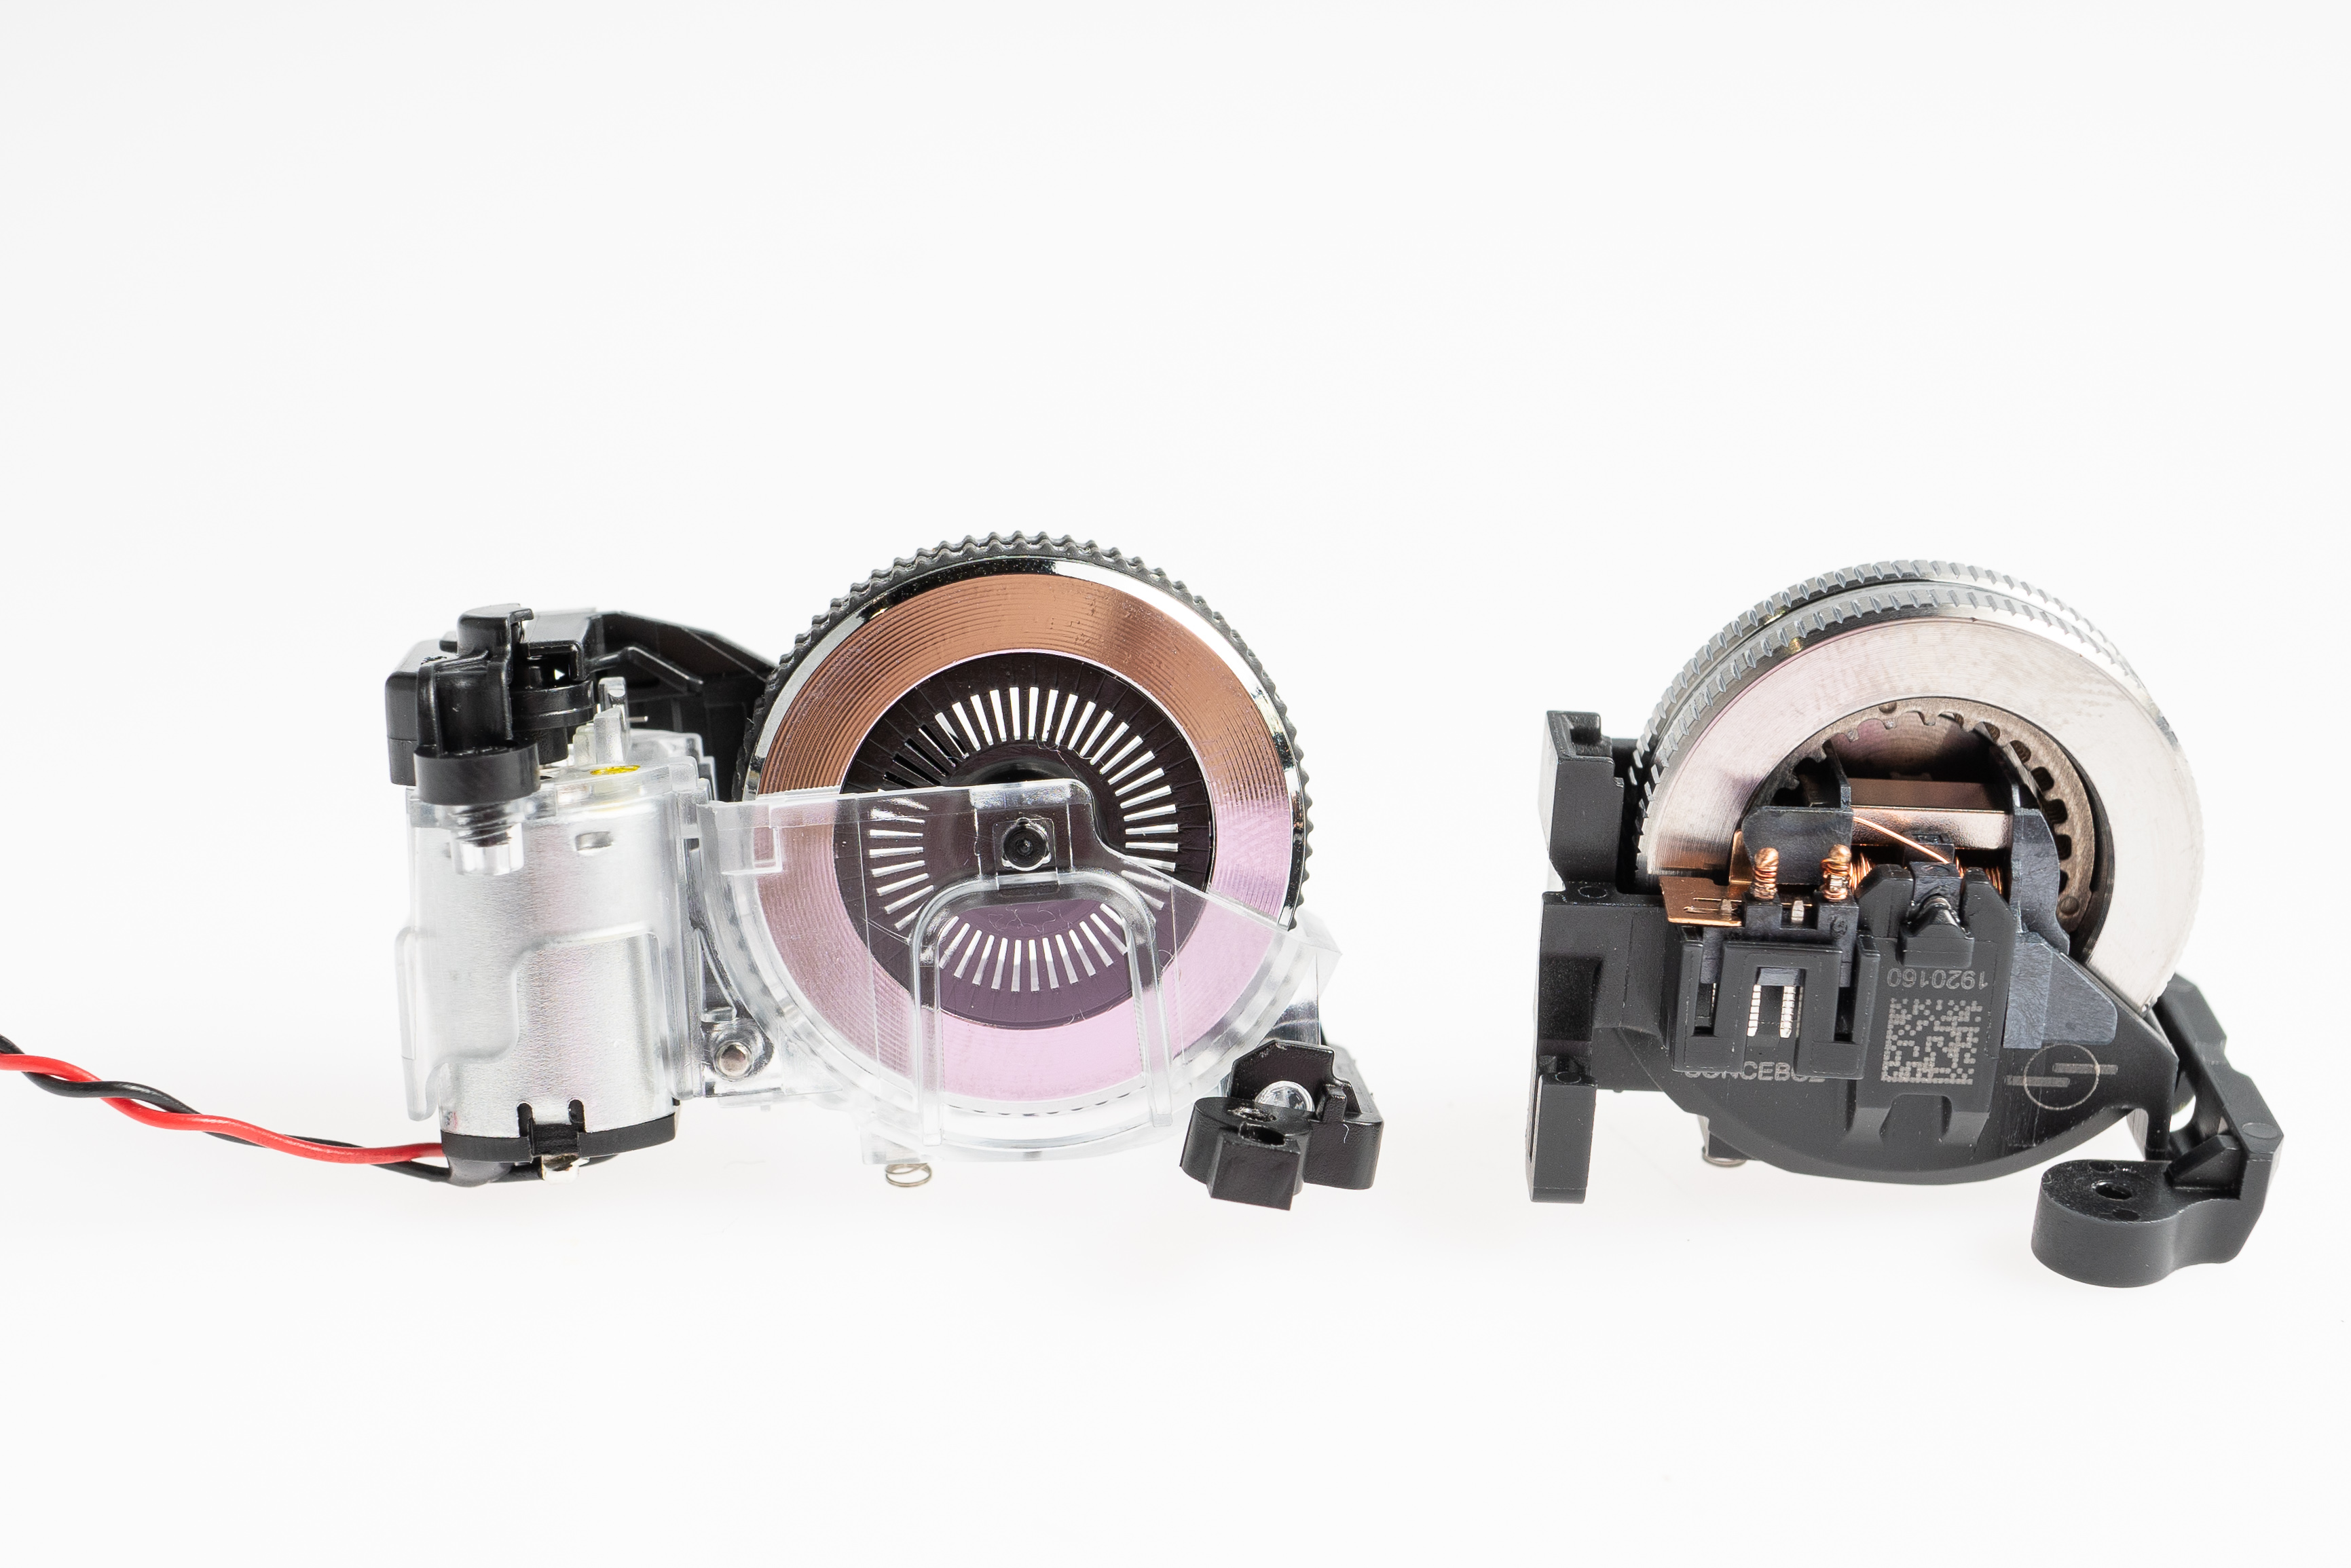
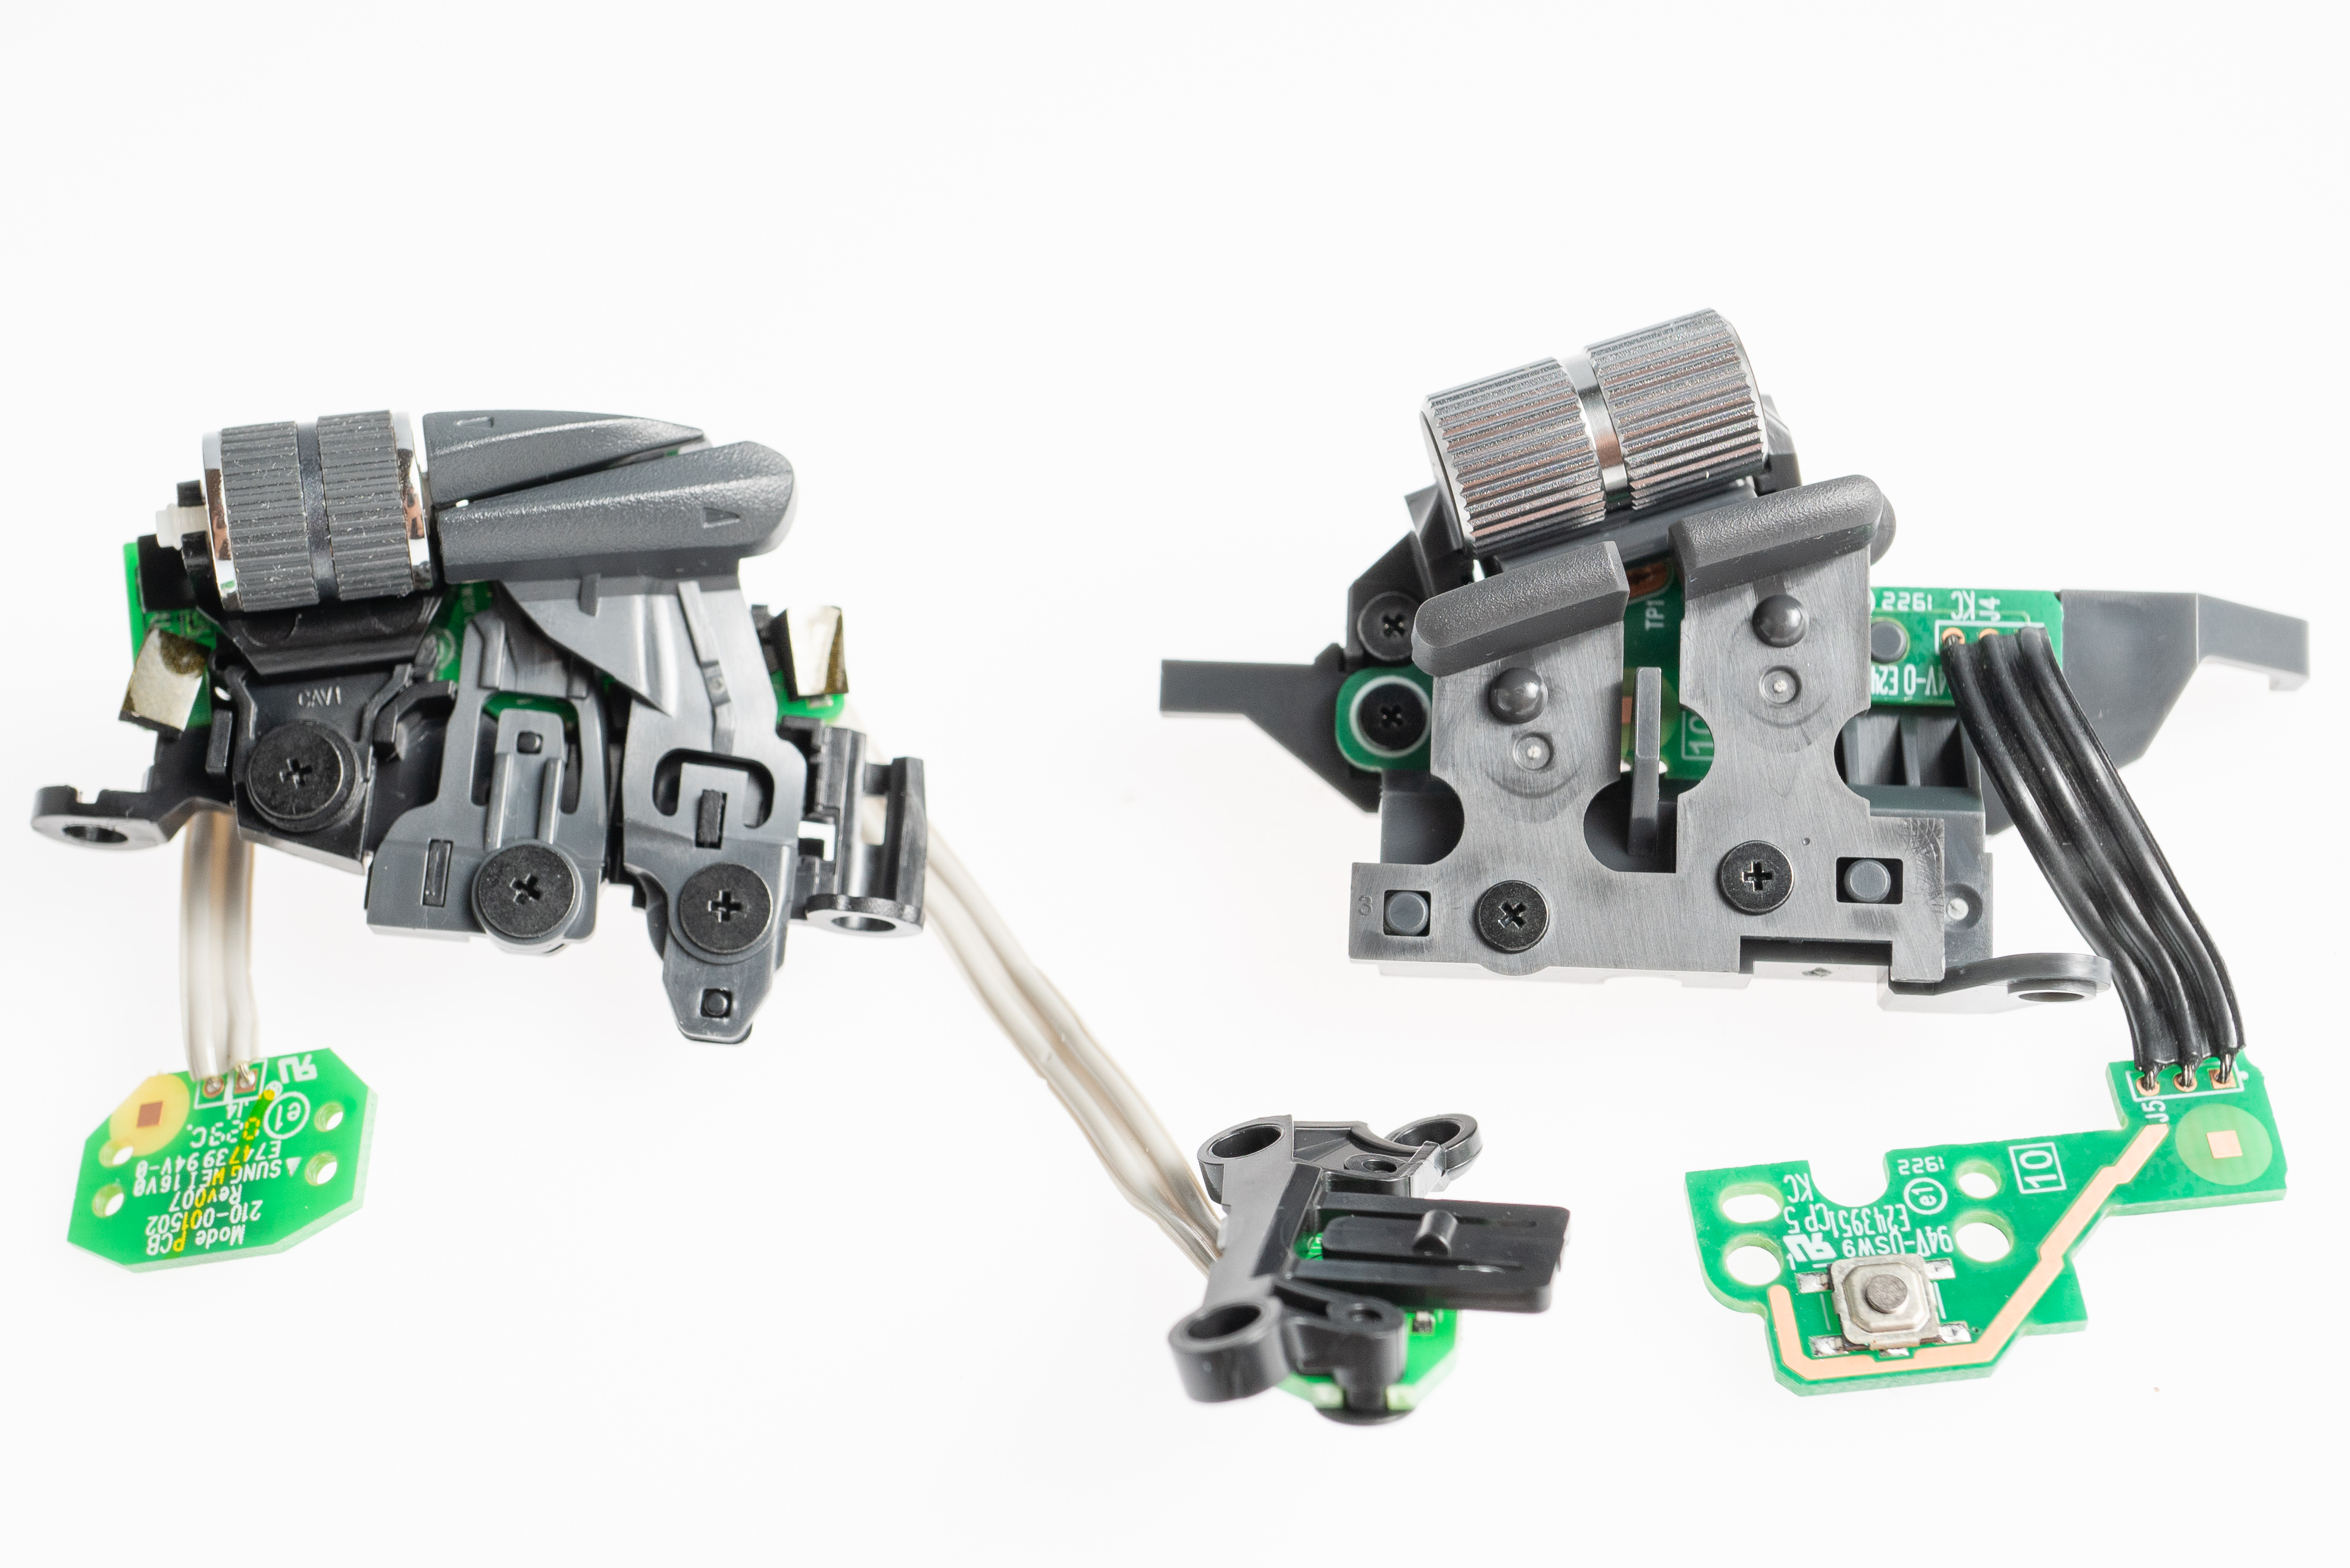
Once we tore into the MX Master 2S, it was clear that the mouse wheel subassembly takes up quite a bit of real estate. Notice the motor hanging out behind the wheel, which is used to turn a cam, which forces a detent ball onto the inside of the wheel for detent mode and releases it for free mode.
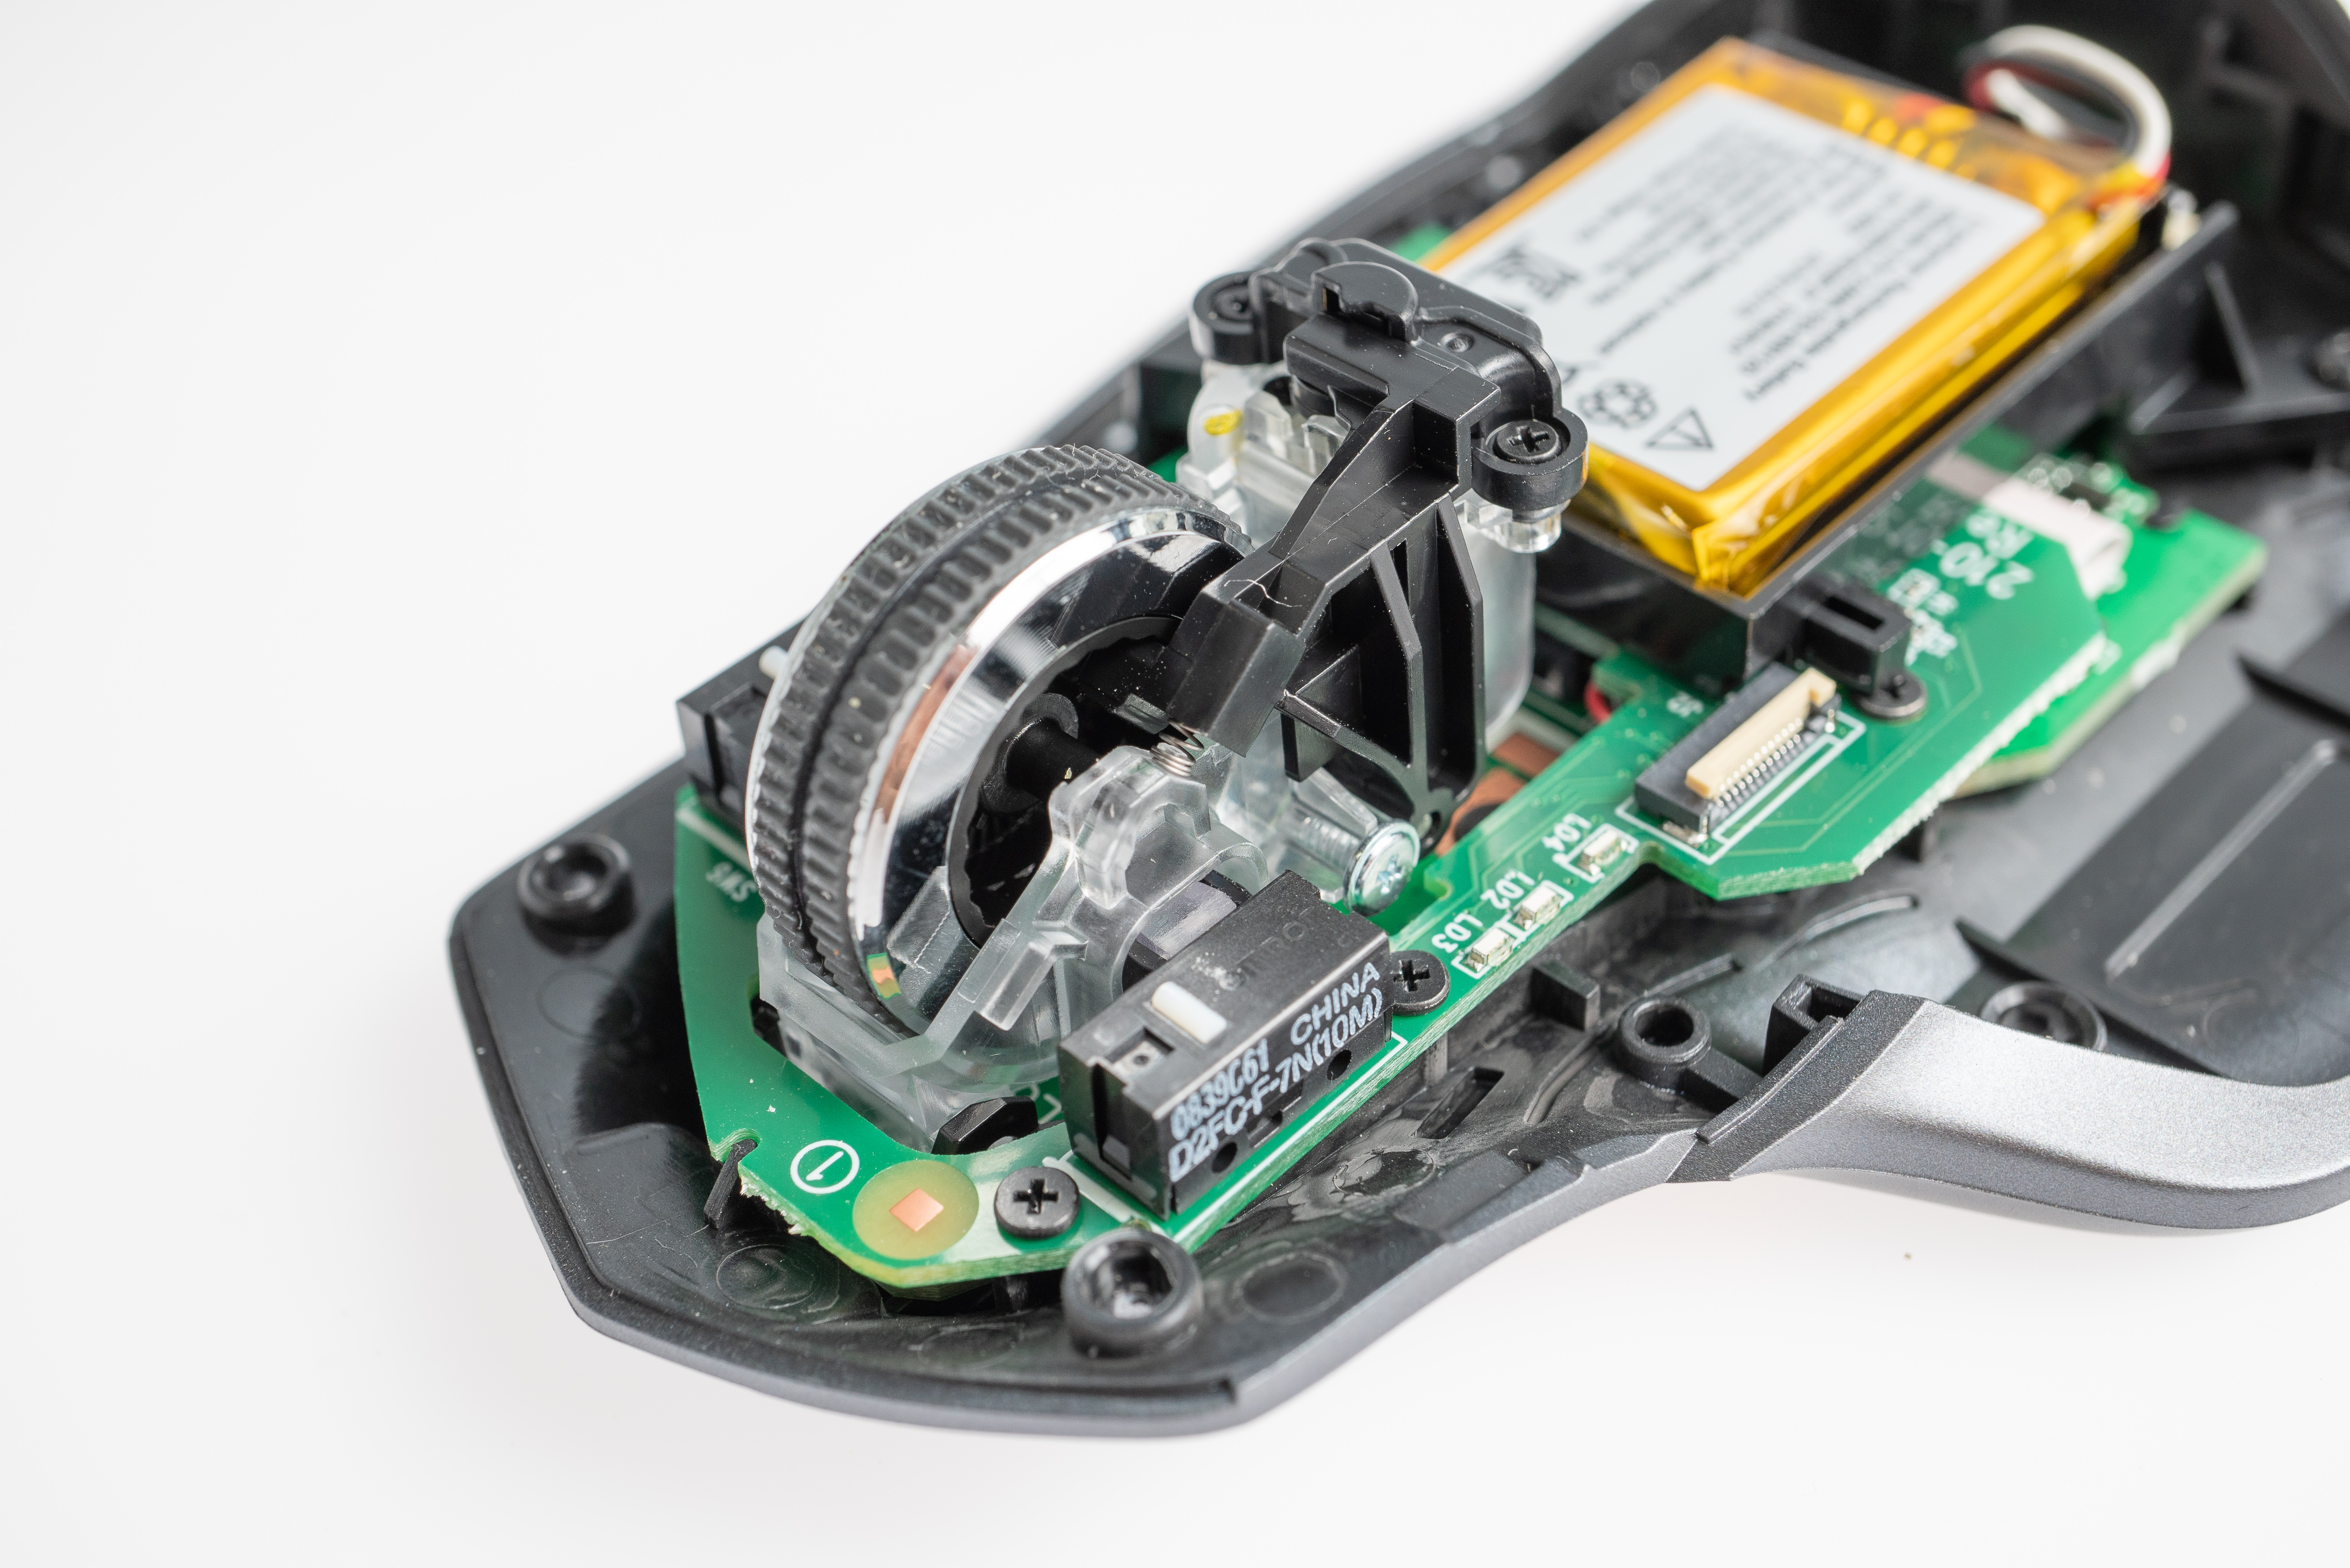
The position and speed of the wheel itself are measured using a simple optical encoder, which shines through the clear plastic housing and relies on the spokes in the mouse wheel to break the beam as it spins. Also notice the rubber part that fits around the wheel of the MX Master 2S to provide grip. This is a great idea in theory, but soft materials like this can degrade over time and they tend to pick up more dust and particles than pure metal.
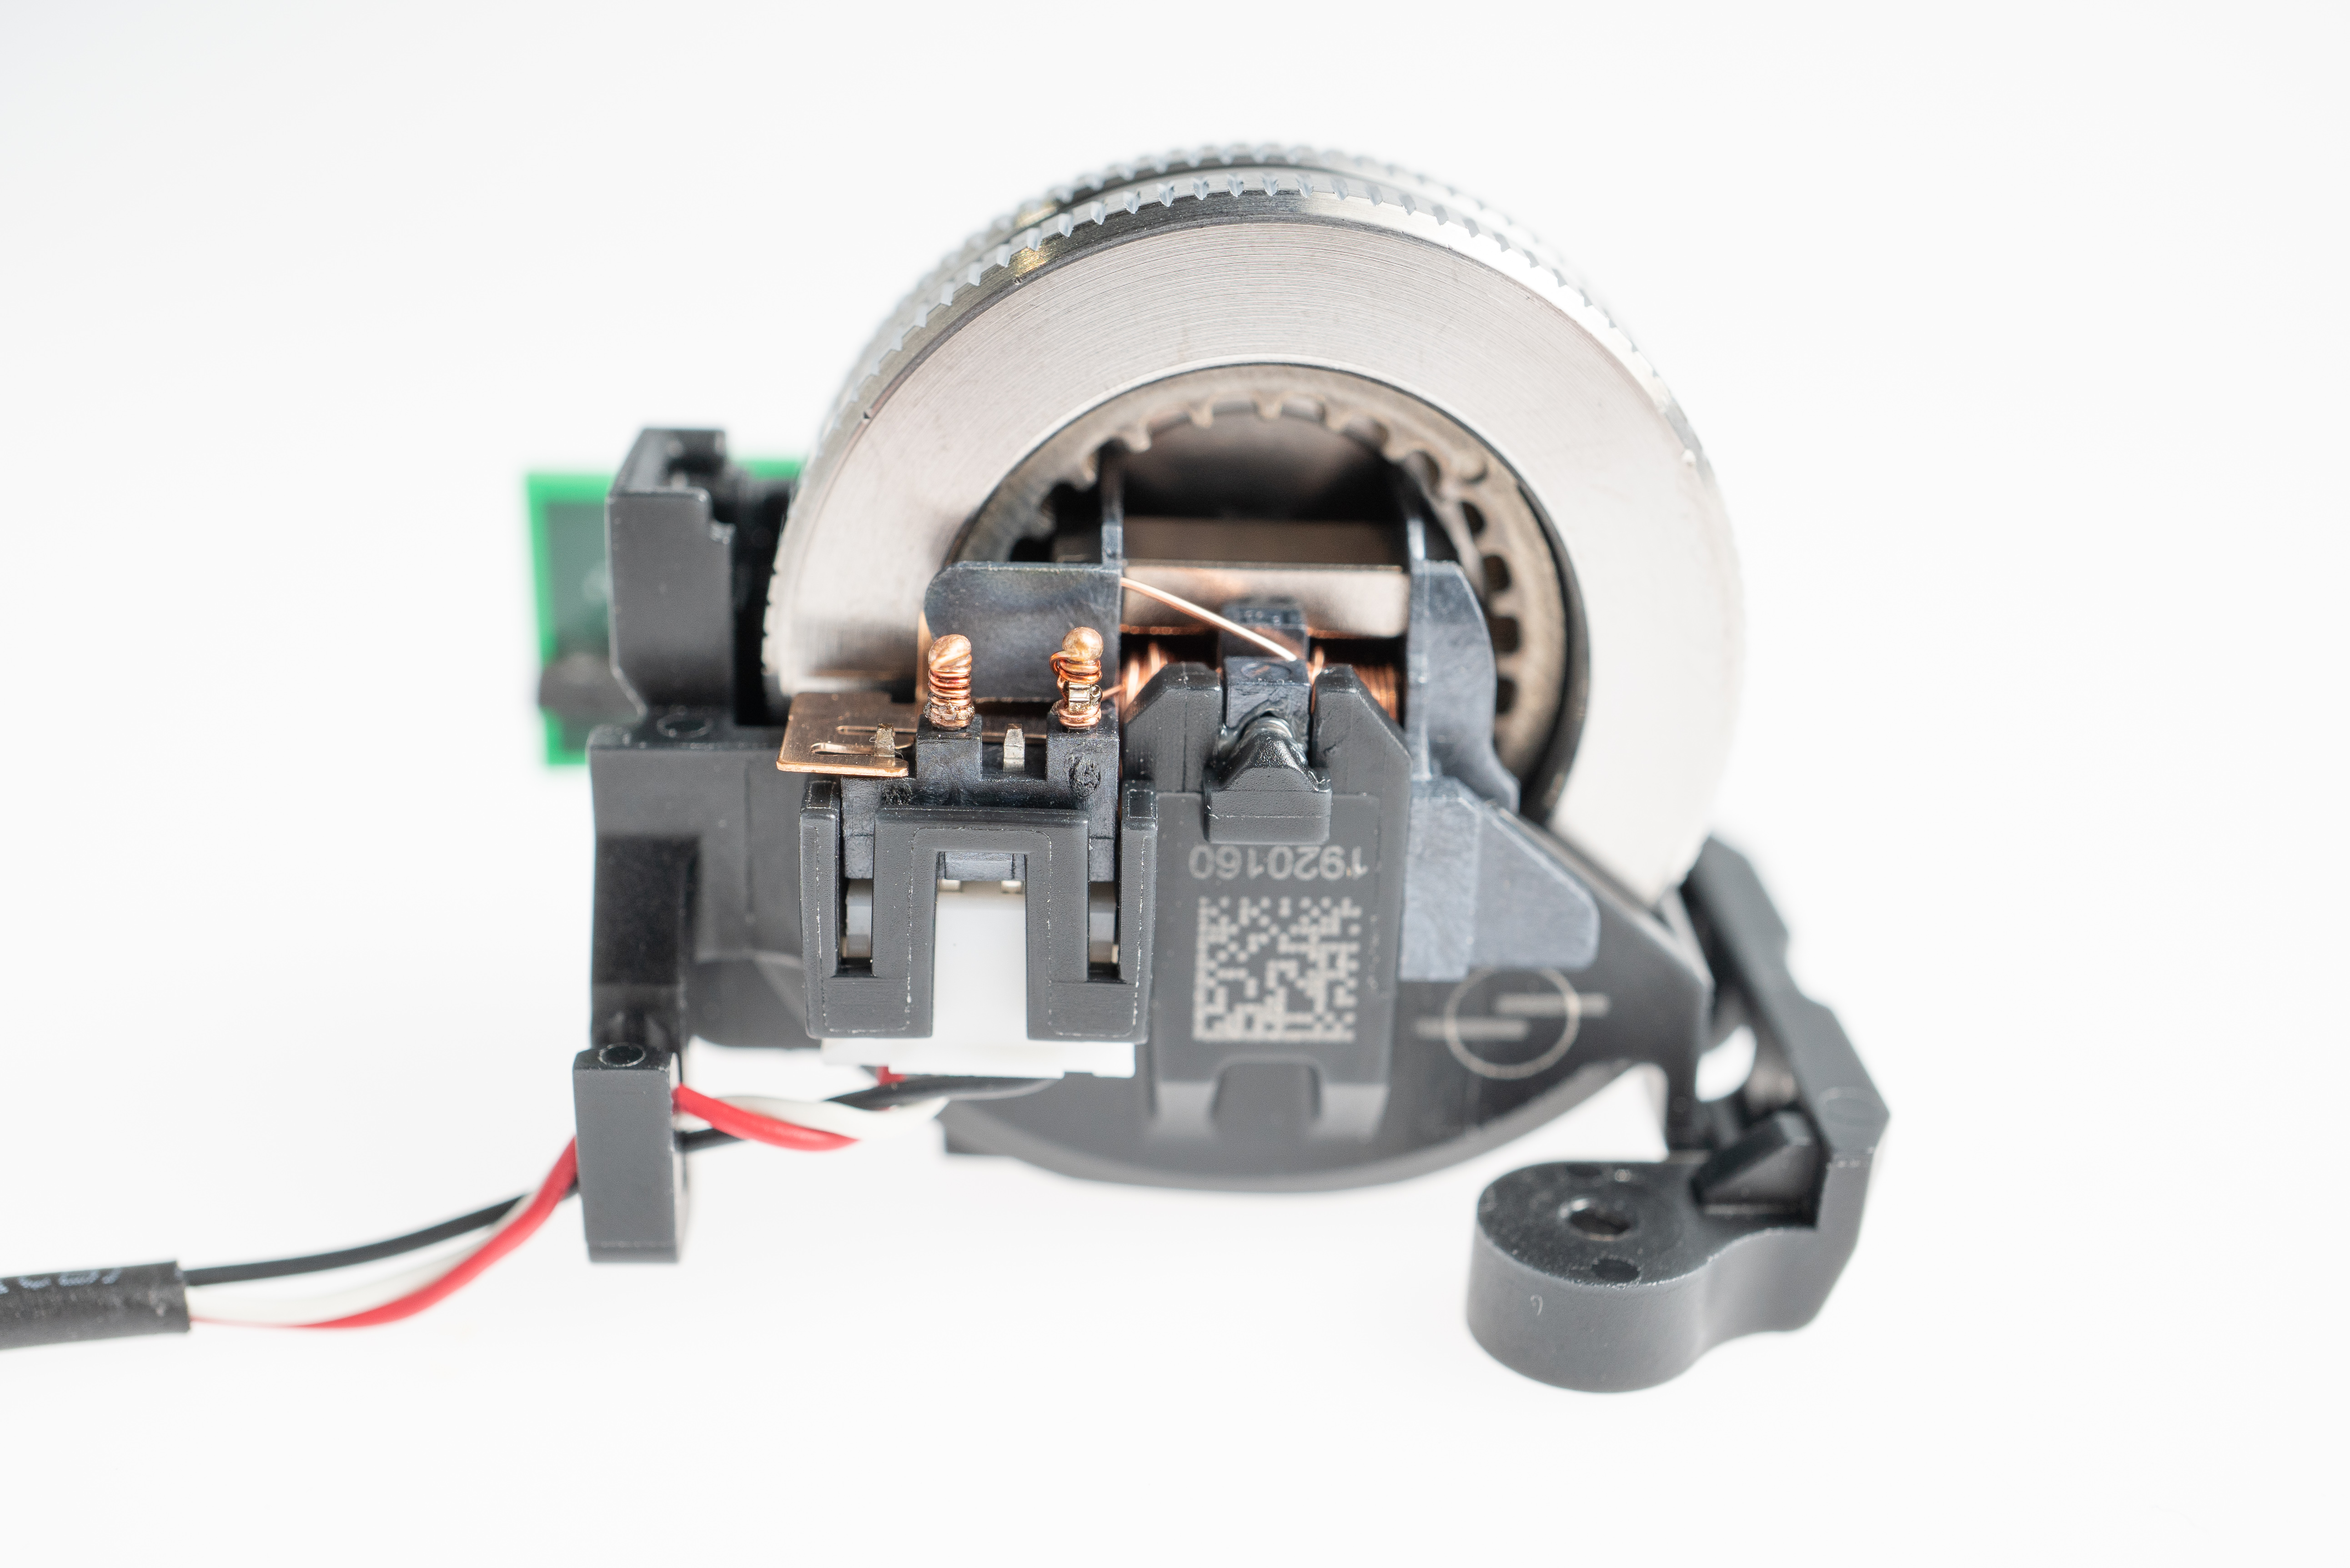
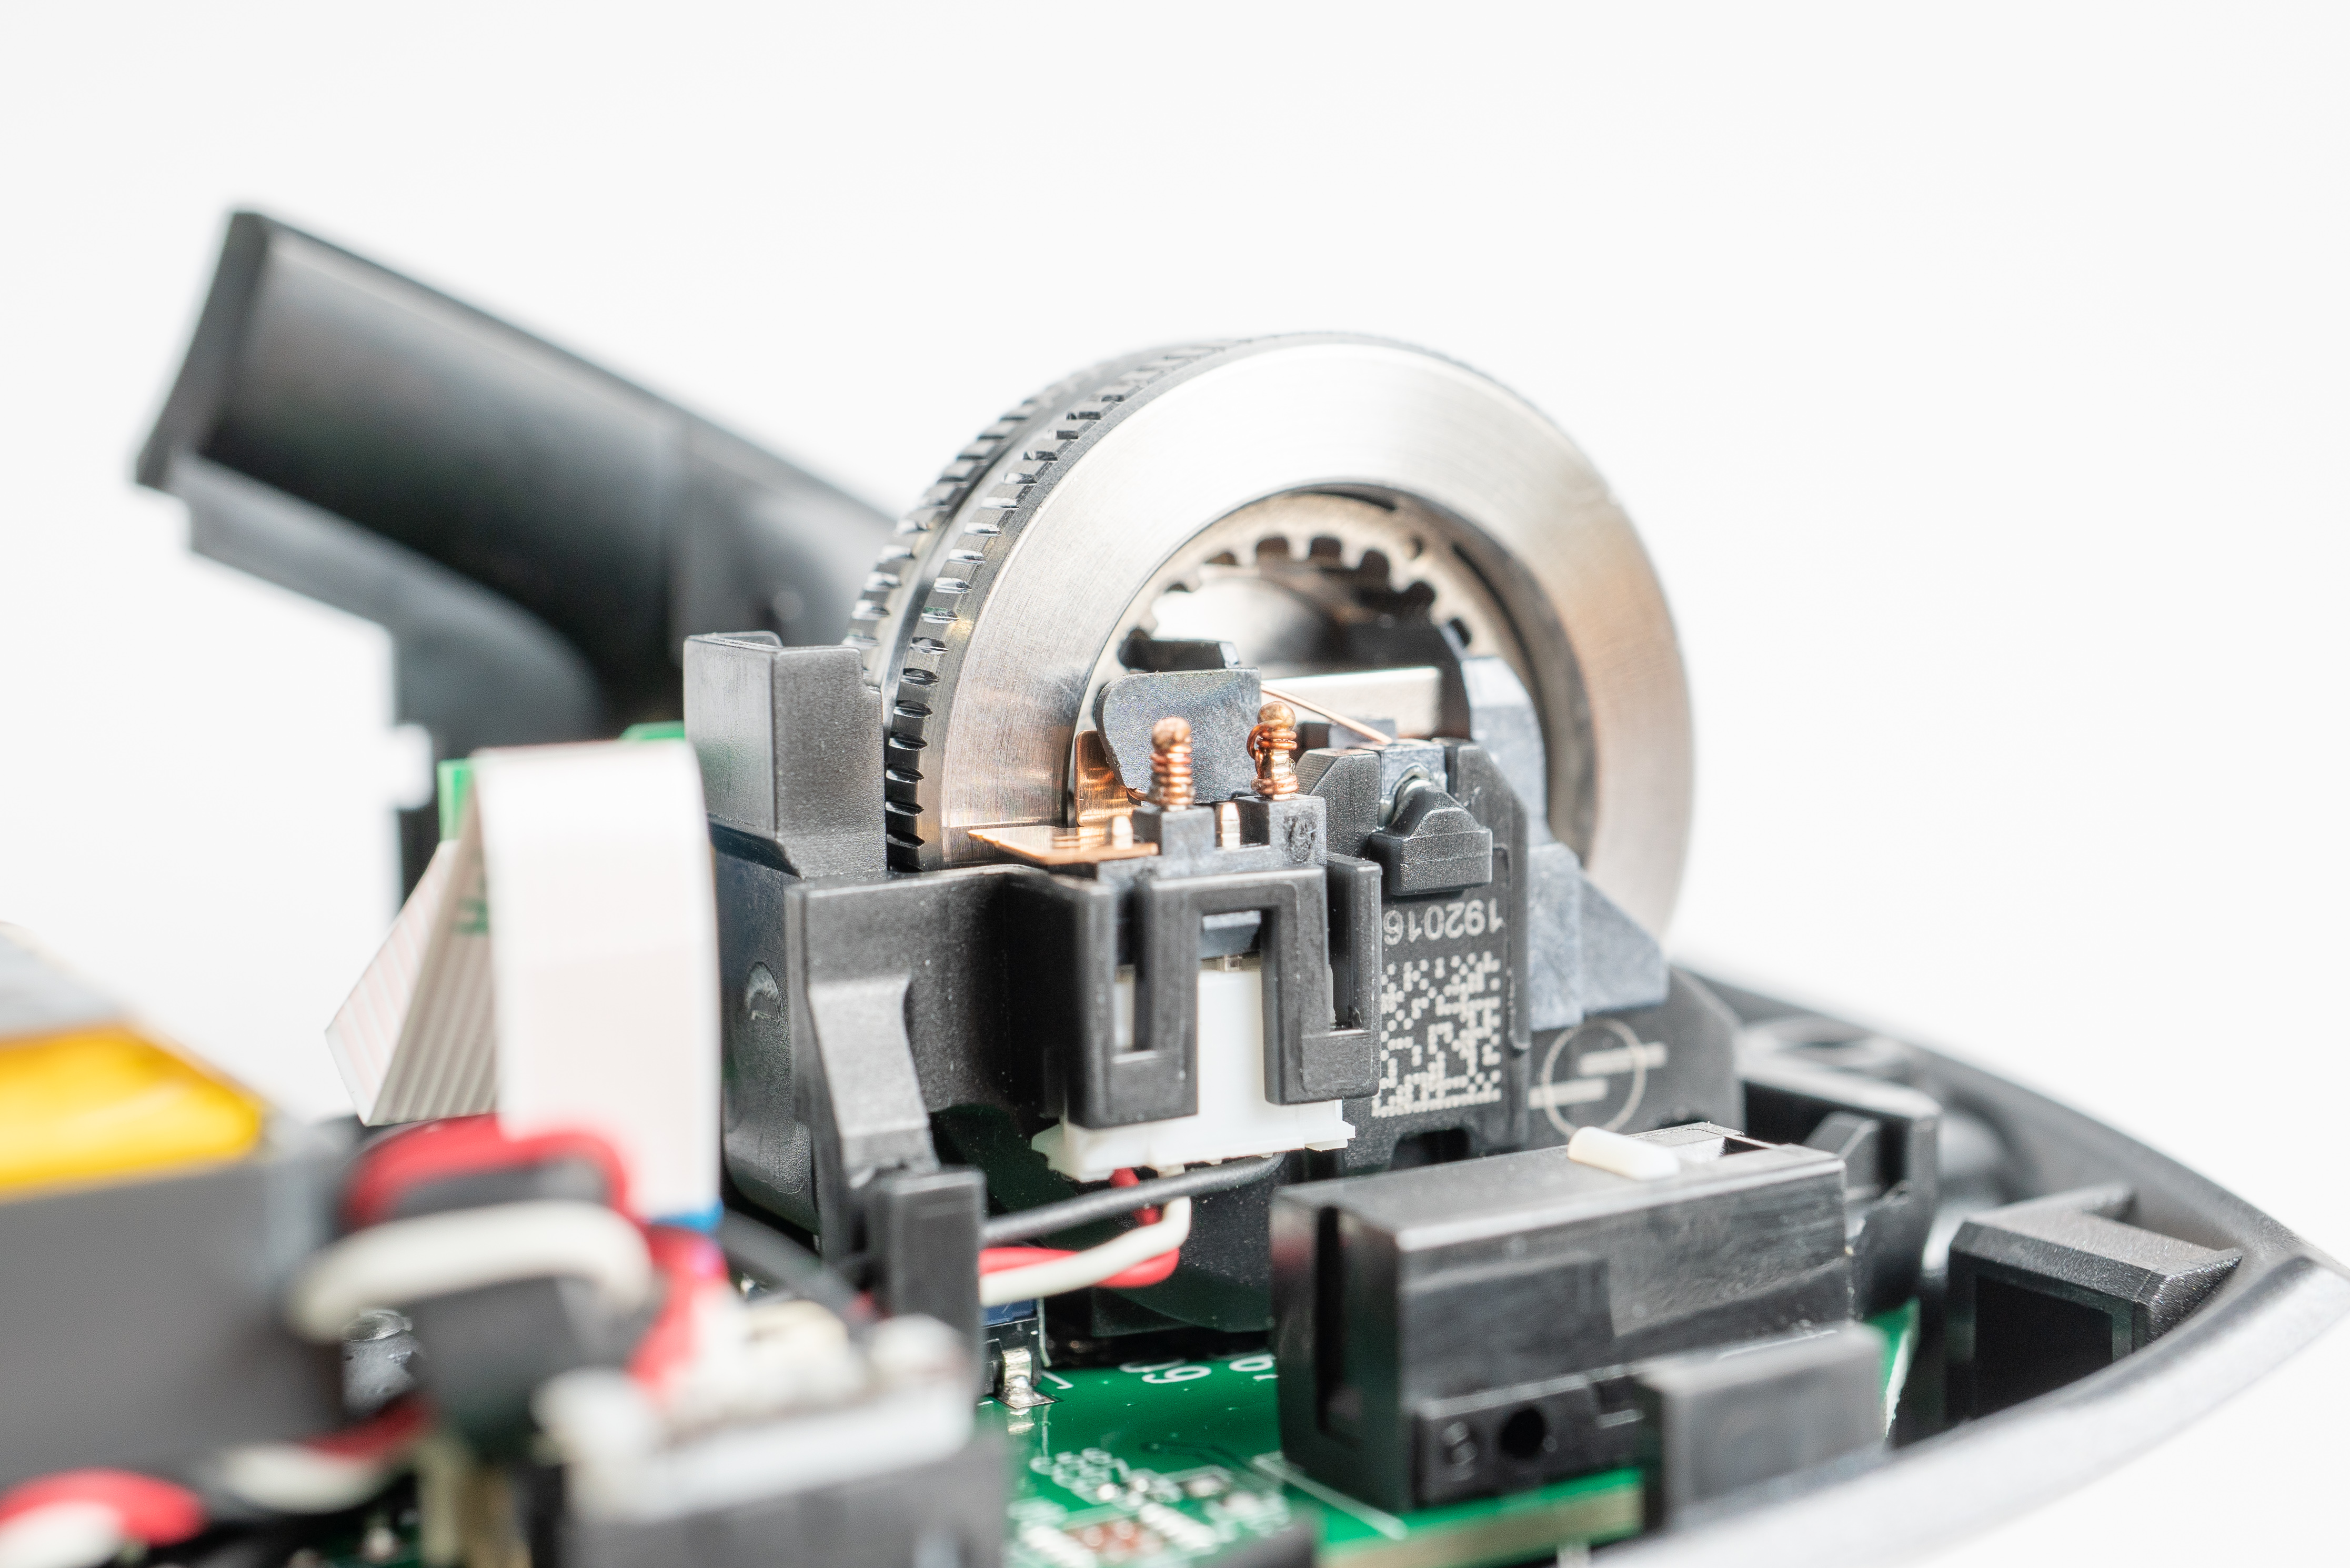
Upon tearing open the MX Master 3, it’s immediately clear how much the Logitech team has been able to reduce the size of the wheel subassembly. They’ve accomplished this with their “MagSpeed” technology, which removes the need for a motor and, in fact, any mechanical contact whatsoever.
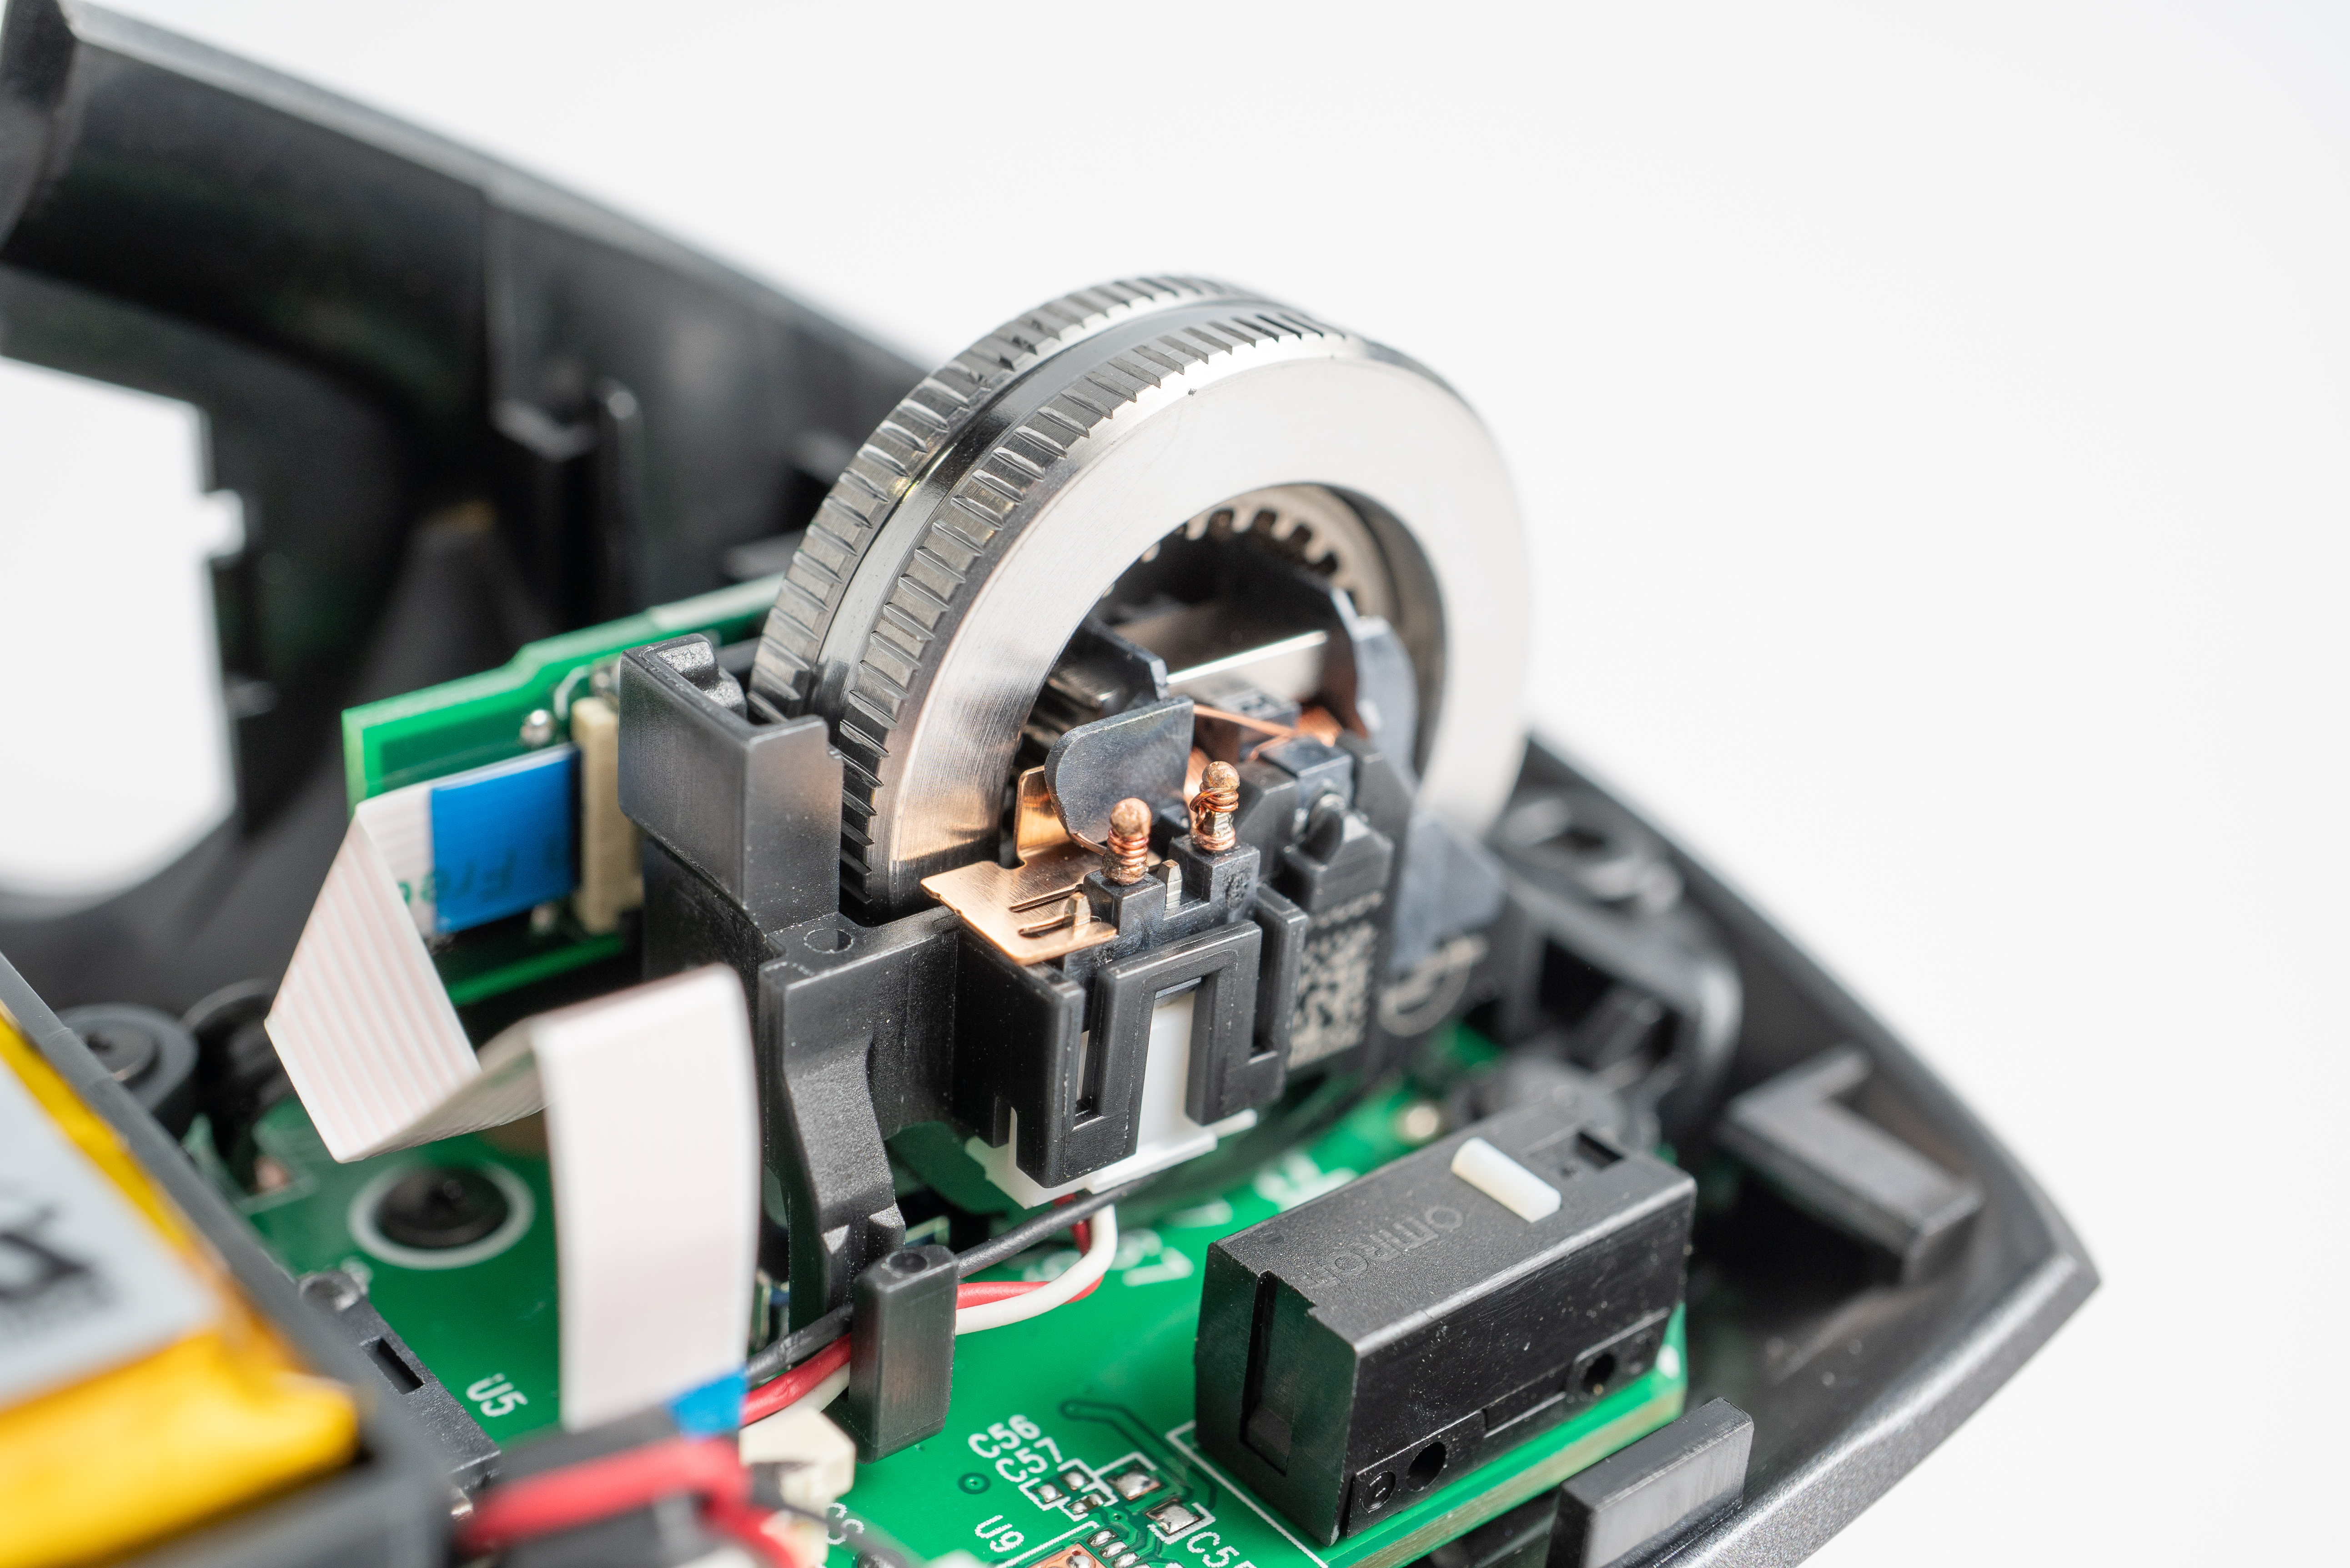
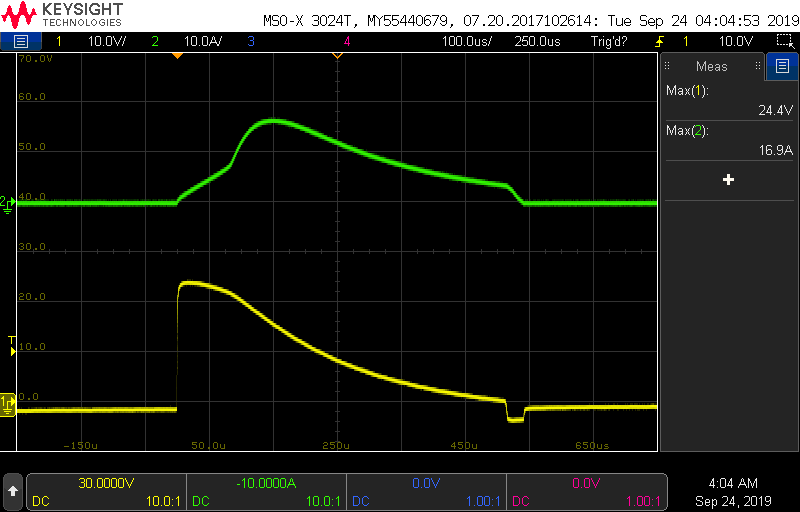
To rapidly switch between detent mode and free mode in the wheel, the Logitech team engineered a fascinating little circuit that energizes a coil to do the work that was previously done by a large motor, cam, springs, swing-arm, and ball detent. We were curious how this worked electrically, so we hooked it up to an oscilloscope in the shop to inspect the waveform.

A quick 25V spike energizes the magnet, which sits still within the internal cavity of the wheel, causing it to pull on the little teeth as they pass, giving the user the illusion of a mechanical detent. Applying 25V in the opposite polarity de-energizes the magnet. The coil is unpowered except during polarity switches and the magnet retains its polarization, so the state remains even when power is shut off. For an explainer on electropermanent magnets, see this article.
So why move away from a mechanical detent to a magnetic one? Aside from the obvious larger size, there are some other disadvantages of the mechanical method found in the MX Master 2S: the motor, cam and detent ball will all wear over time, changing the feel of the detent and eventually failing. The sound is more noticeable and harder to control, too–there’s only so much you can do to mitigate the clicking sound of two parts interacting. The mechanical interaction also contributes to a bit of backlash in the 2S wheel, while the magnet in the 3 makes the wheel feel snappy and precise. And finally, the switching between modes in the 2S isn’t very fast, since you’re relying on the motor to spin the cam, the cam to move the arm, and the arm to come in contact with the wheel. Without any moving parts to worry about, the new wheel takes only 50 milliseconds to change modes.
Switching to a magnet certainly wasn’t an easy endeavor for Logitech. It was likely a significant R&D investment and required custom components, but the results were clearly worth it for the performance benefits.
Ergonomics Are King
The refined ergonomics of the MX Master 3 build on the already-good feel of the MX Master 2S. In reality, both of these devices feel great in the hand, so how did Logitech improve? One of the major changes is in the way users actually interact with device.
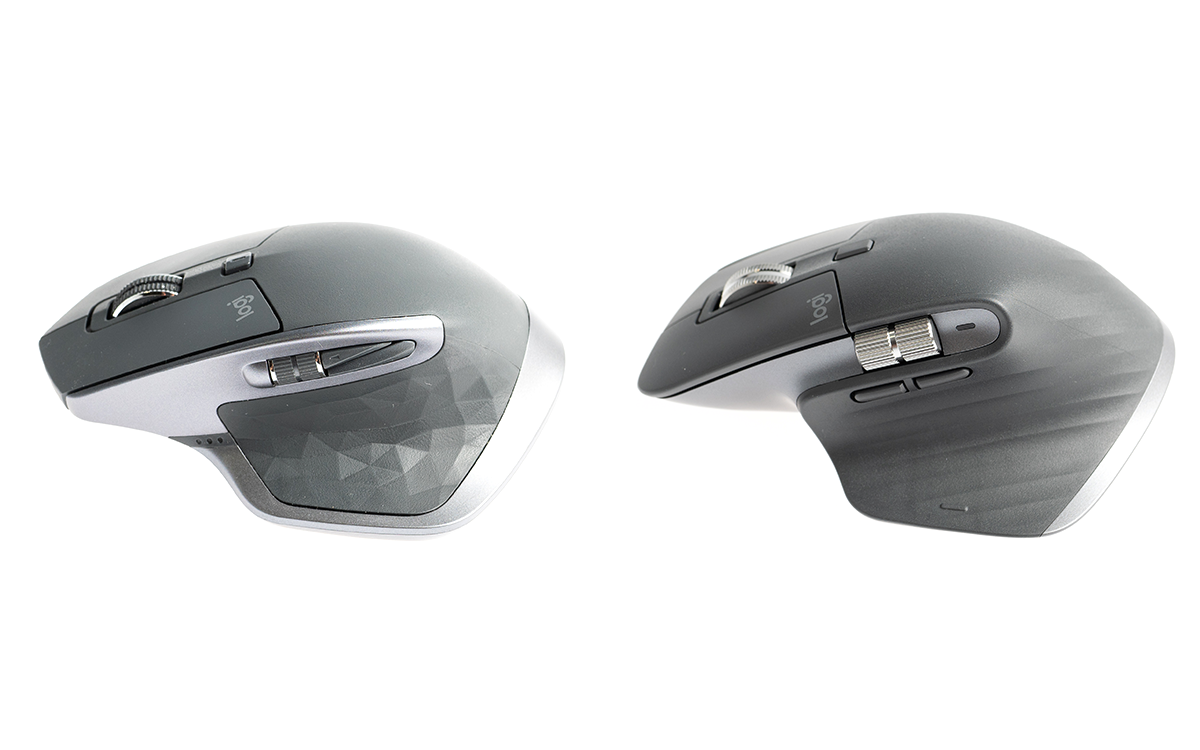
The placement and sizing of components on the thumb side of the mouse were refined significantly. The placement of the two protruding side buttons on the MX Master 3 is a huge improvement. On the MX Master 2S they were small, nested together and hard to reach. The side buttons on the Master 3 are in a more natural location and spaced apart so they’re easy to discern without awkwardly feeling around for them.

The thumb wheel has grown and now protrudes from the left side of the mouse more substantially. Users are more likely to interact with the buttons than the wheel to begin with, so why place them side-by-side in the 2S? Now, the placement cleverly follows the path your thumb takes up the side, offering you the oft-used buttons first, followed by a larger, metal thumb wheel if you need it.
The changes to the shape and design of the shell of the MX Master 3 are subtle, aside from the curves and spacing of the mostly-visual scallops, which are now brought around to the back. It’s interesting to compare the forms of the two generations side-by-side and consider what motivated the designers to make the changes they did. Next let’s examine how these shape and layout changes affect the mechanical design on the inside of the mouse.
Mechanical Complexity in Service of Ergonomics
The internal mechanical architecture of both MX Masters is complex. There are PCBAs stacked on top of each other, flex cables navigating around the boards, moving subassemblies to keep clear of and a pouch battery to protect. The design priority of these products is, understandably, the outward-facing ergonomics and user experience. The mechanical design, therefore, is in service of the outside shapes and features.
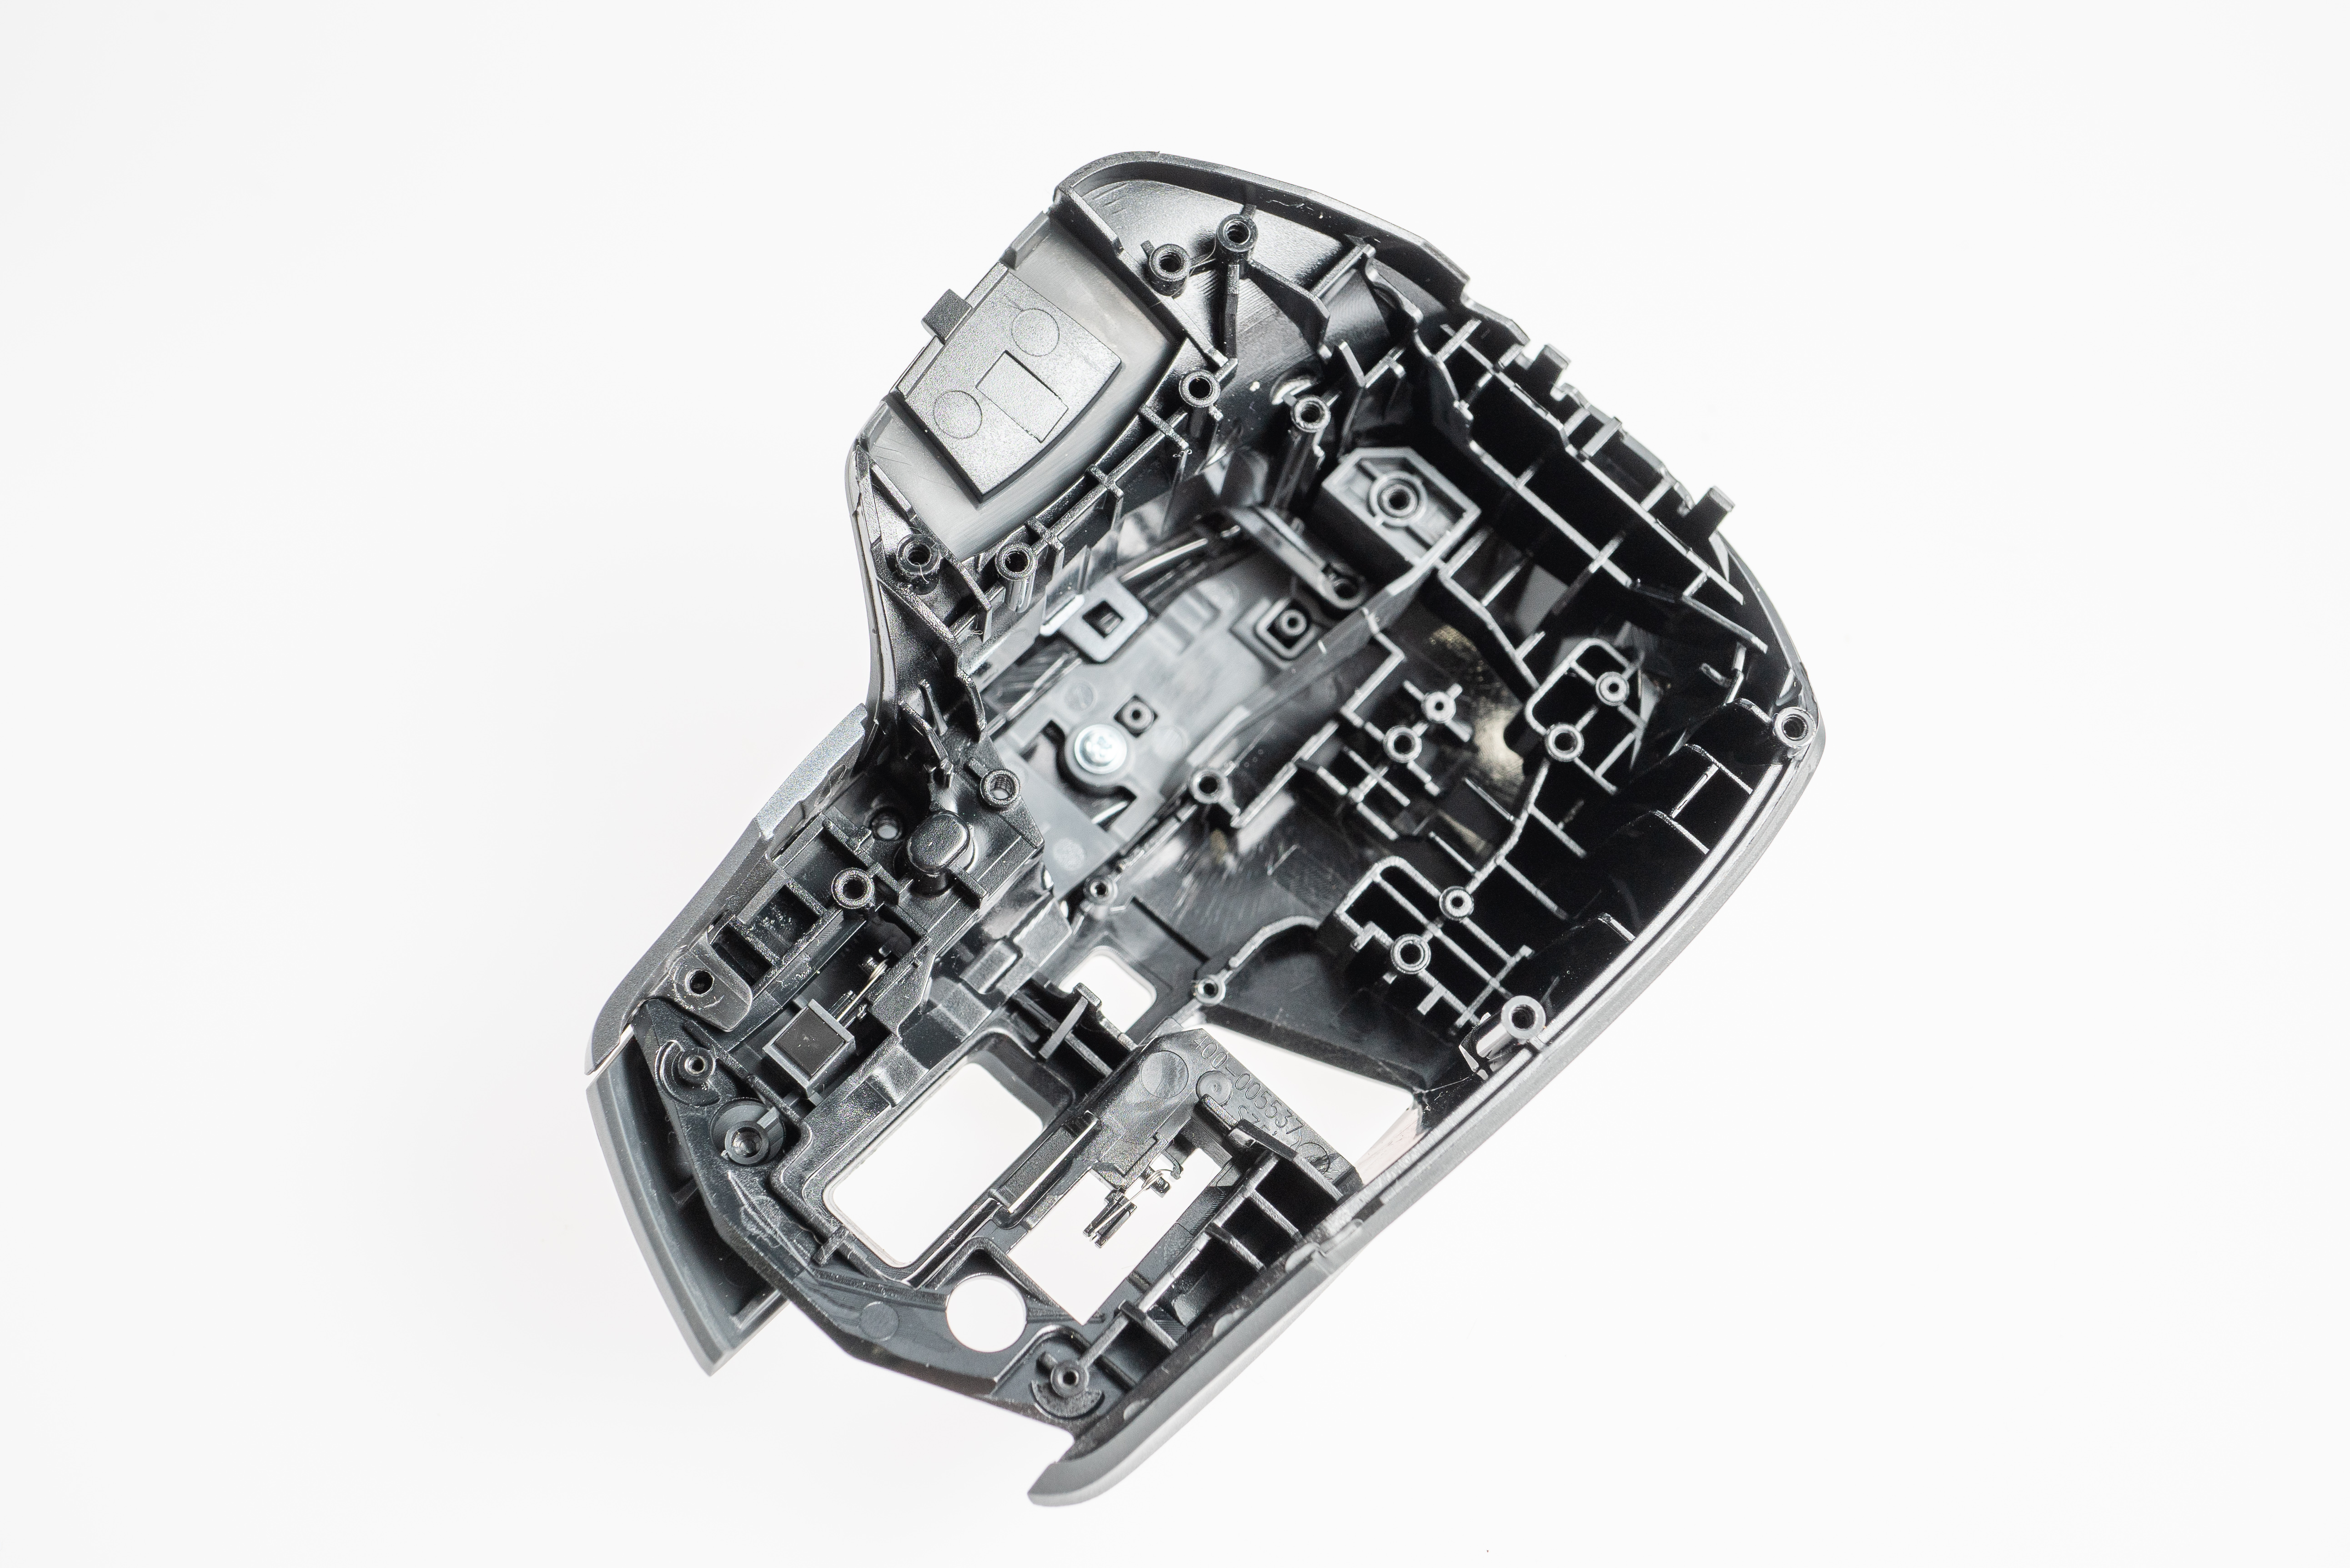
The first thing that comes to mind upon seeing the inside of the two top housings side-by-side is “wow, they really cut down on the ribs on the inside of the MX Master 3”. Consider the challenges of fabricating the tools that molded these parts: thin slices of steel create the cavities that are filled with plastic. The small size of the ribs in the MX Master 2S, and the distance between them, did not make the molders’ job easy. The result, however, is a housing that’s super stiff, but overly so. The top housing doesn’t have to be particularly rigid on its own, after all: the only thing that matters is how stiff the product is once assembled, and screwing the top housing into the base adds a lot of rigidity.
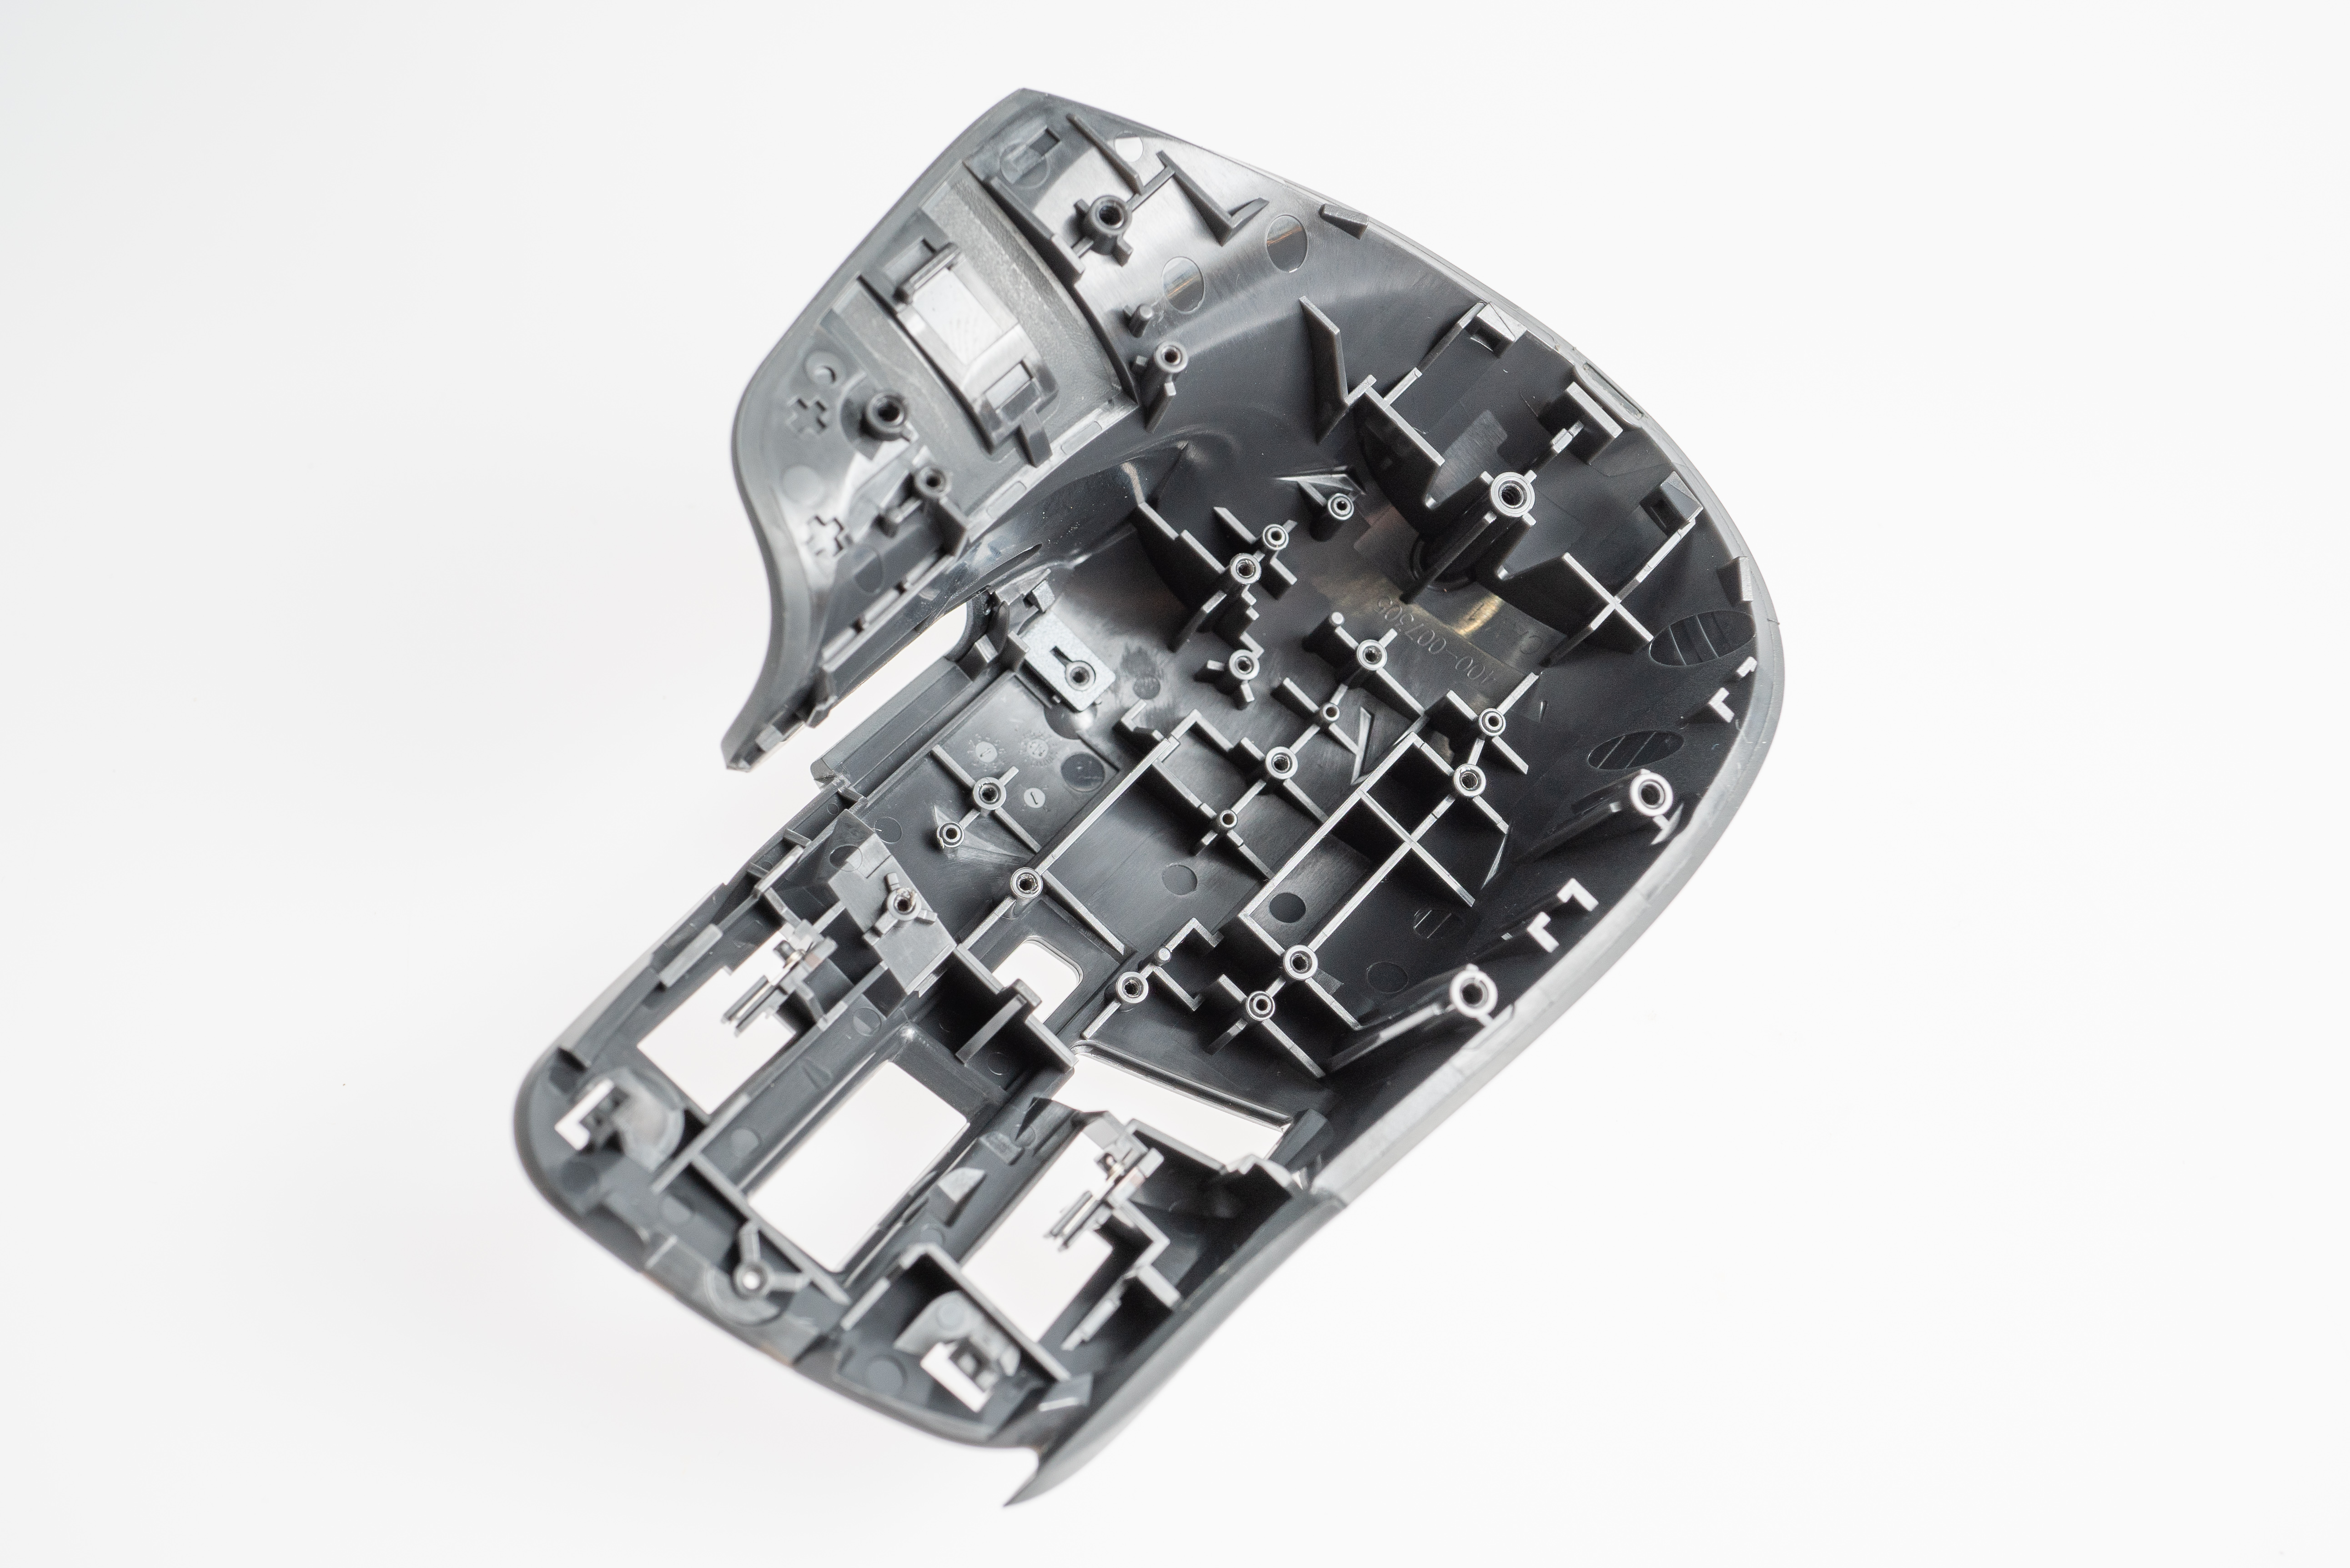
For the MX Master 3, something big changed within the manufacturing team. Many improvements were made, possibly at the request of the molder, increased skill of the engineer who designed the last housing, or the hiring of a new, more experienced engineer. Nevertheless, the amount of ribs used in the previous generation was deemed overkill, so they reduced it and made the lives of their molder a lot better. The closest ribs are now much further apart, roughly 4.5 mm instead of the common 2 mm gap found in the 2S.
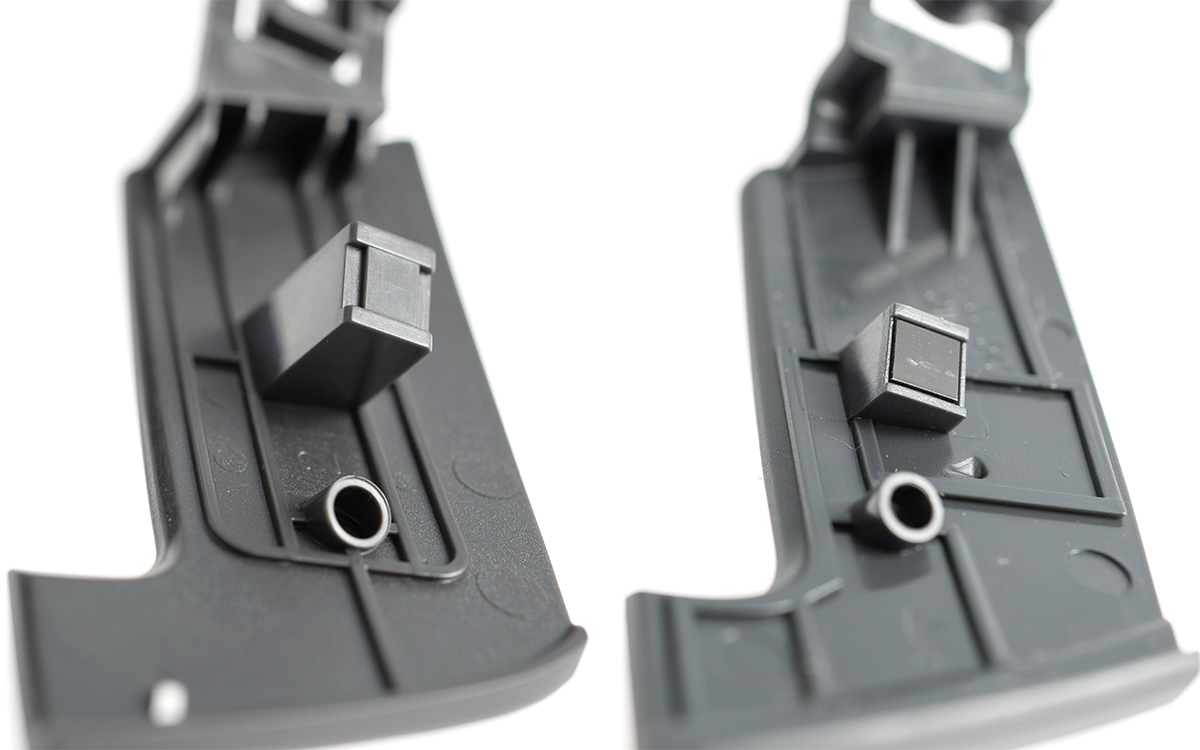
Also notice the cutouts for the thumb wheels in the top housings and how they compare. For the Master 3, the Logitech team designed the top housing in a way that the area under the thumb wheel sticks out as a peninsula of plastic instead of joining back up to the rest of the housing. This is a seemingly negligible change that actually goes a long way towards simplifying the tooling by reducing the complexity and size of undercuts. It also makes the part more flexible, which makes installing the thumb wheel and thumb buttons easier.
Logitech truly shows off its expertise in the design of the many buttons, in both generations. This is where microns of material really matter for the longevity and feel of things users interact with every day, and it’s clear they’ve designed hundreds of them.
The button feel in both the 2S and 3 are controlled precisely by the use of interchangeable mold inserts. Engineering teams carefully select features they have the most confidence in before allowing their partners to create tooling. The core and cavity of the injection molding tooling are used to produce those, and are pricey to change later. Inserts, however, are reserved for features that may need to be changed and refined over time, such as the precise feel of buttons. The inserts can be removed from the tool and replaced with another of different size in order to quickly change the final part without having to endure pricey tool modifications. Inserts are used in the flexures of all the buttons and on the switch contact surfaces so the amount of plastic that contacts the buttons can be adjusted with micron-level precision over time.

This is especially critical for the “gesture” button that lives under the overmolded rubber, where the thickness of the plastic isn’t the only factor to consider in changing the feel of the button: the team also had to consider the flex and feel of the overmolded rubber.
In addition to the use of inserts, tiny torsion springs provide more springback to the main buttons than the plastic can provide alone. This is an impressive addition to the already-complex assembly of these devices that likely provides a minimal, but clearly important, improvement to the button feel.
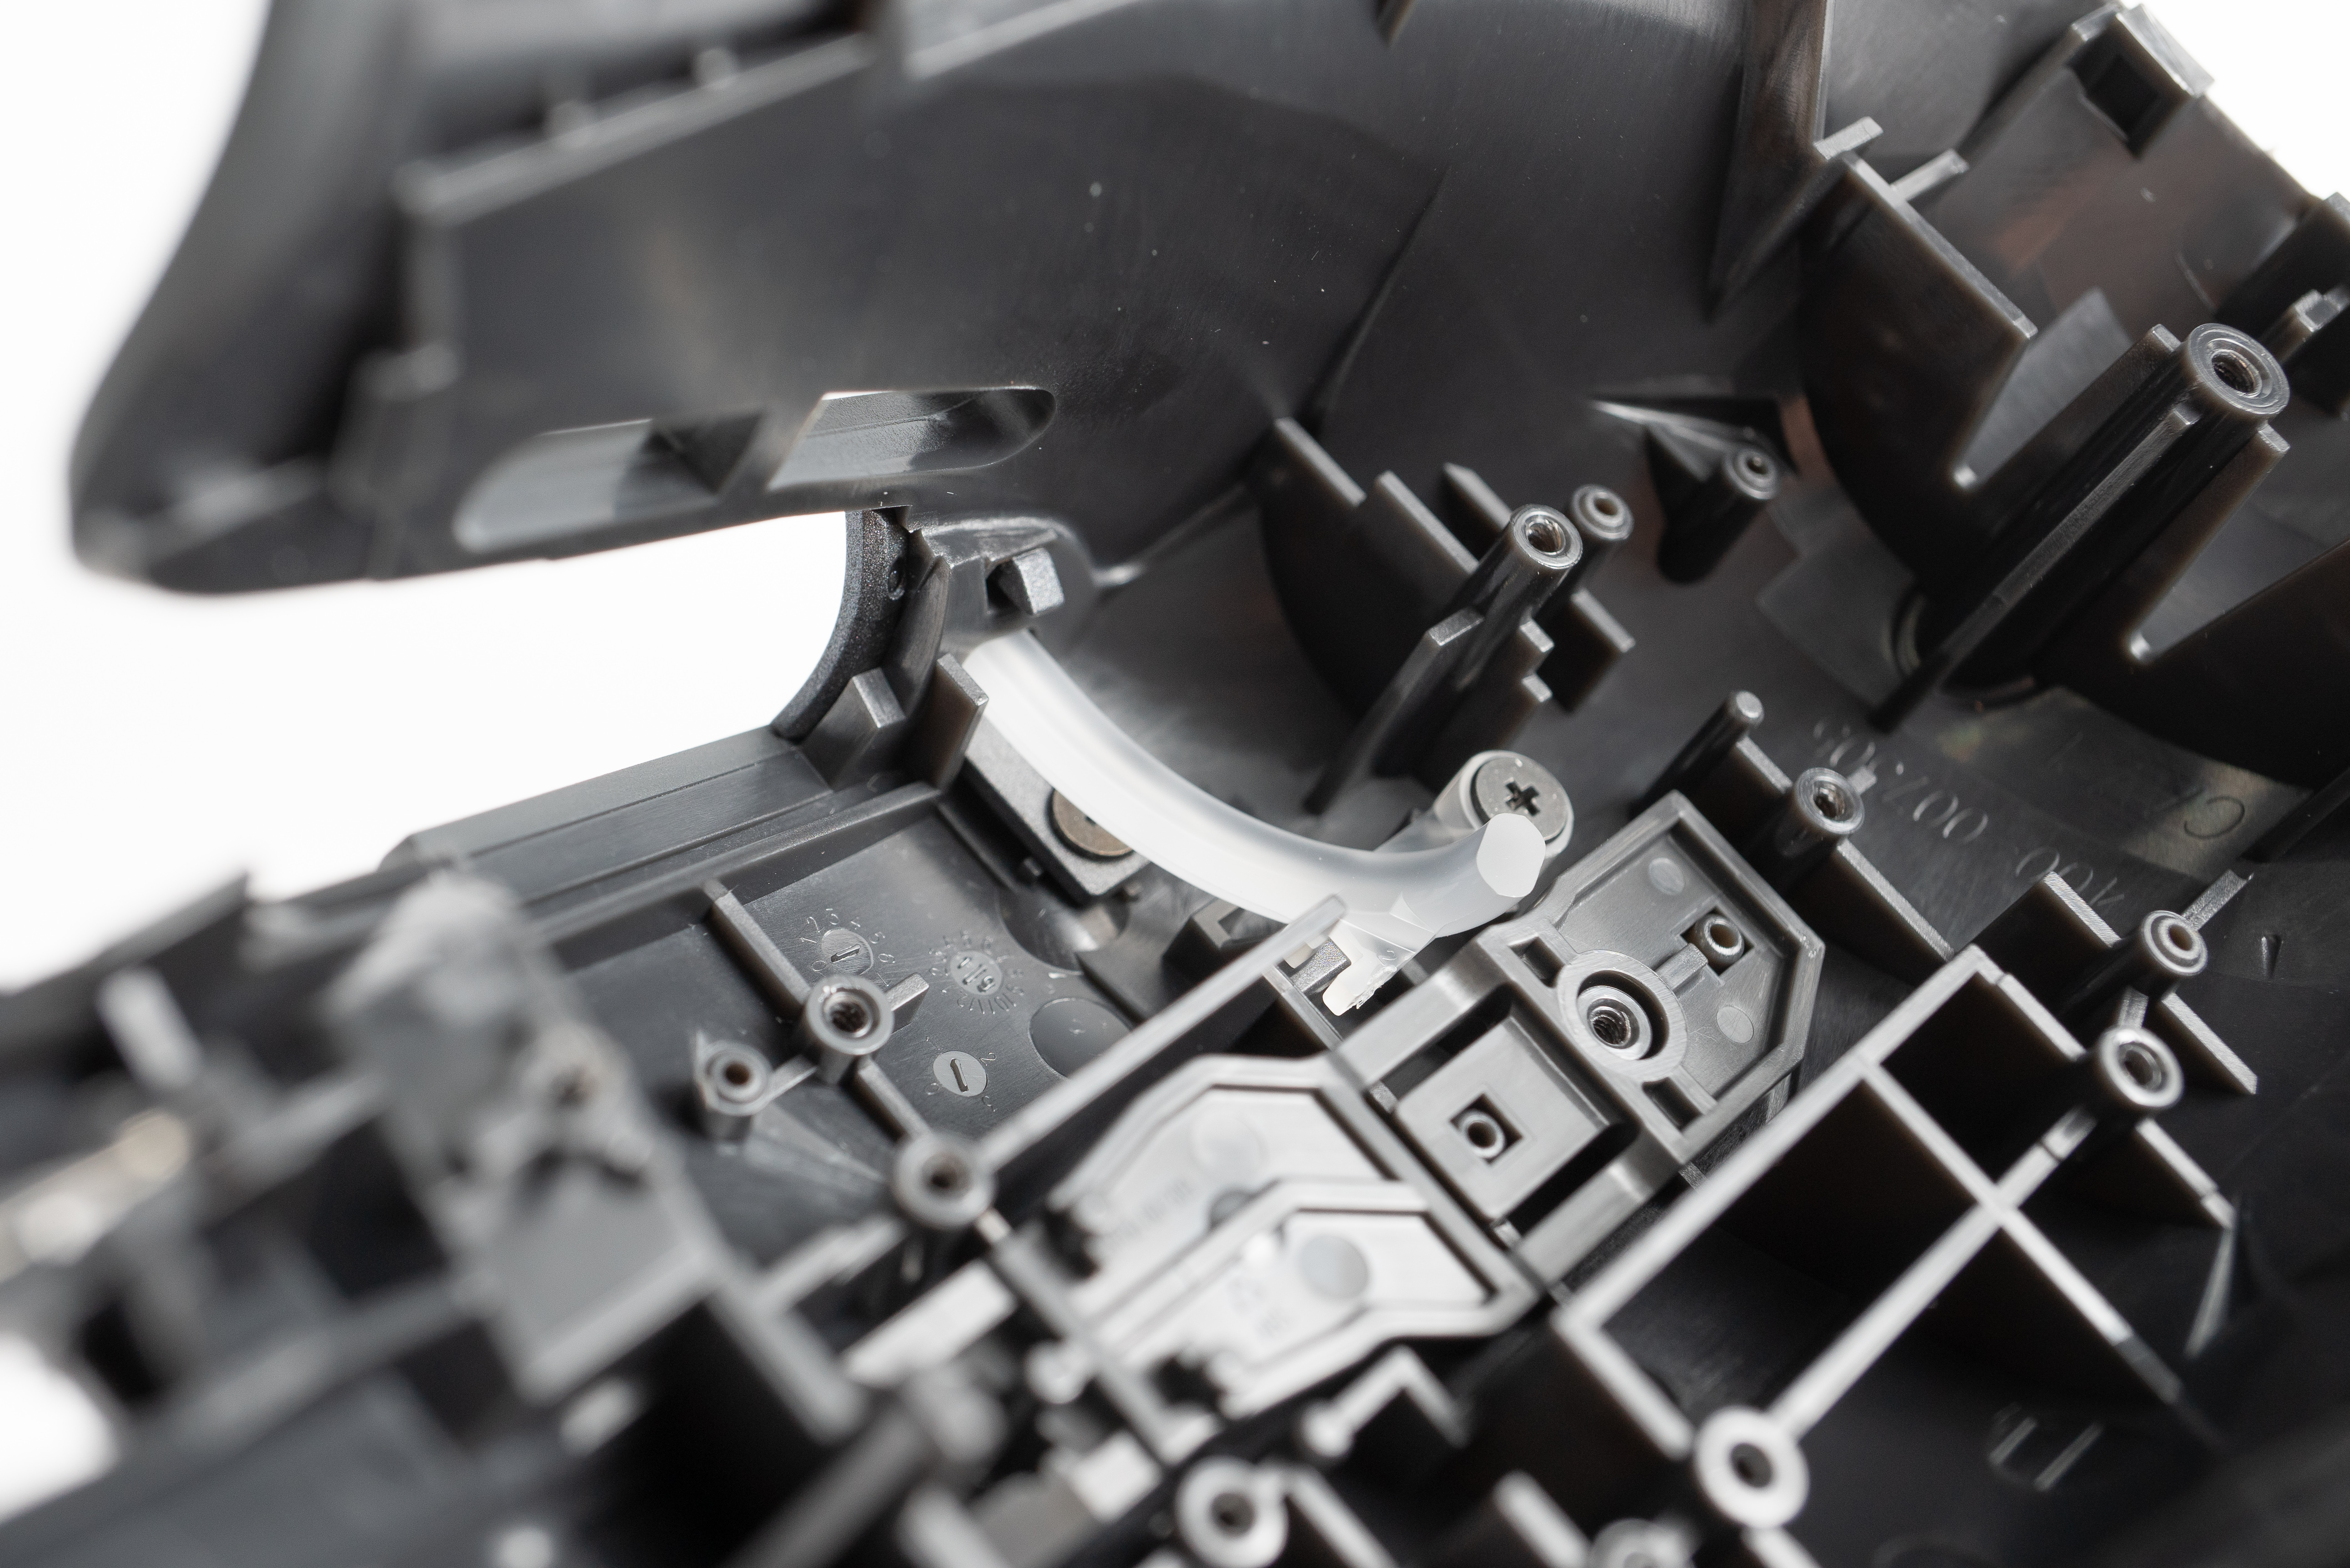
We can’t wrap up this section without mentioning the impressive light pipe design of the MX Master 3’s power light. What may appear as a simple molded plastic part to most is actually an incredibly-complex part with well thought-out and tested surface textures. These light pipes are often obsessed over by optical engineers for months, simulated in software and prototyped dozens of times.
Next we’ll talk about the last category of parts in the MX Master 3, whose placement and shape is driven by the mechanical design: the electronics.
Electronics: building on a Logitech foundation
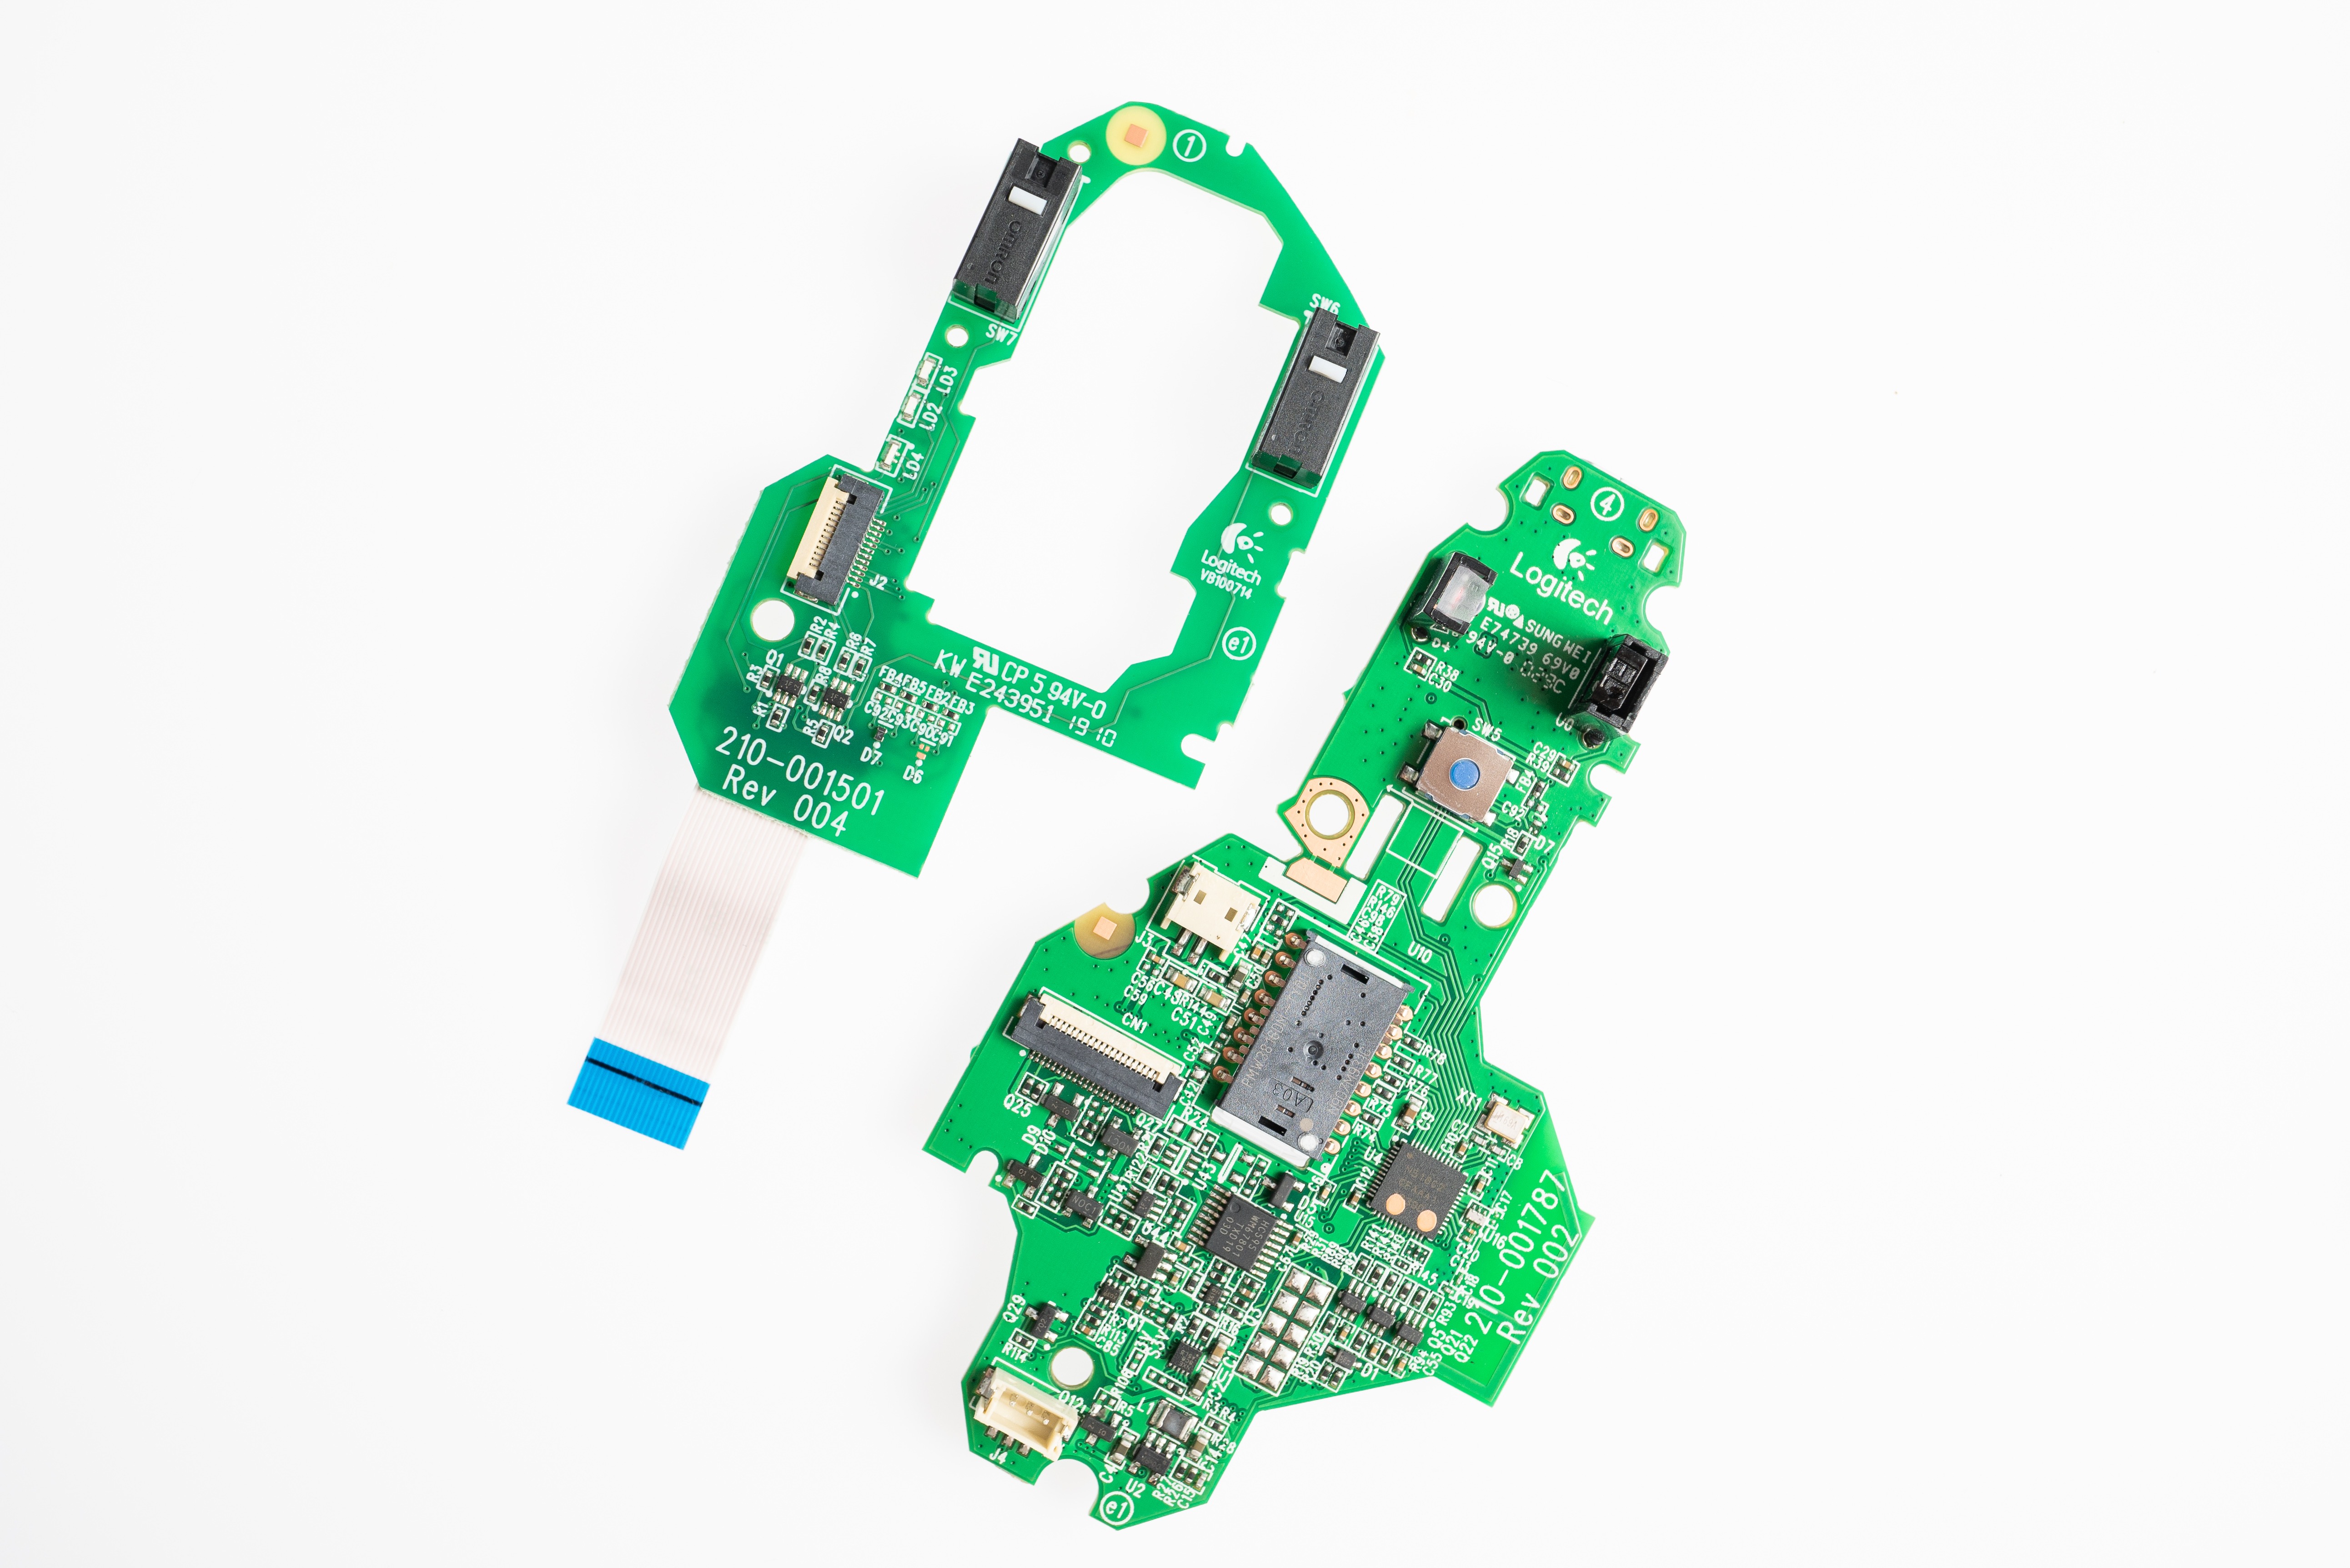
Although the total number of PCBAs has gone up by one in the MX Master 3, the overall design and placement of the boards has been simplified. This is most noticeable in the lack of a “upper deck”, which formerly held both main buttons and sat above the main board in the MX Master 2S.
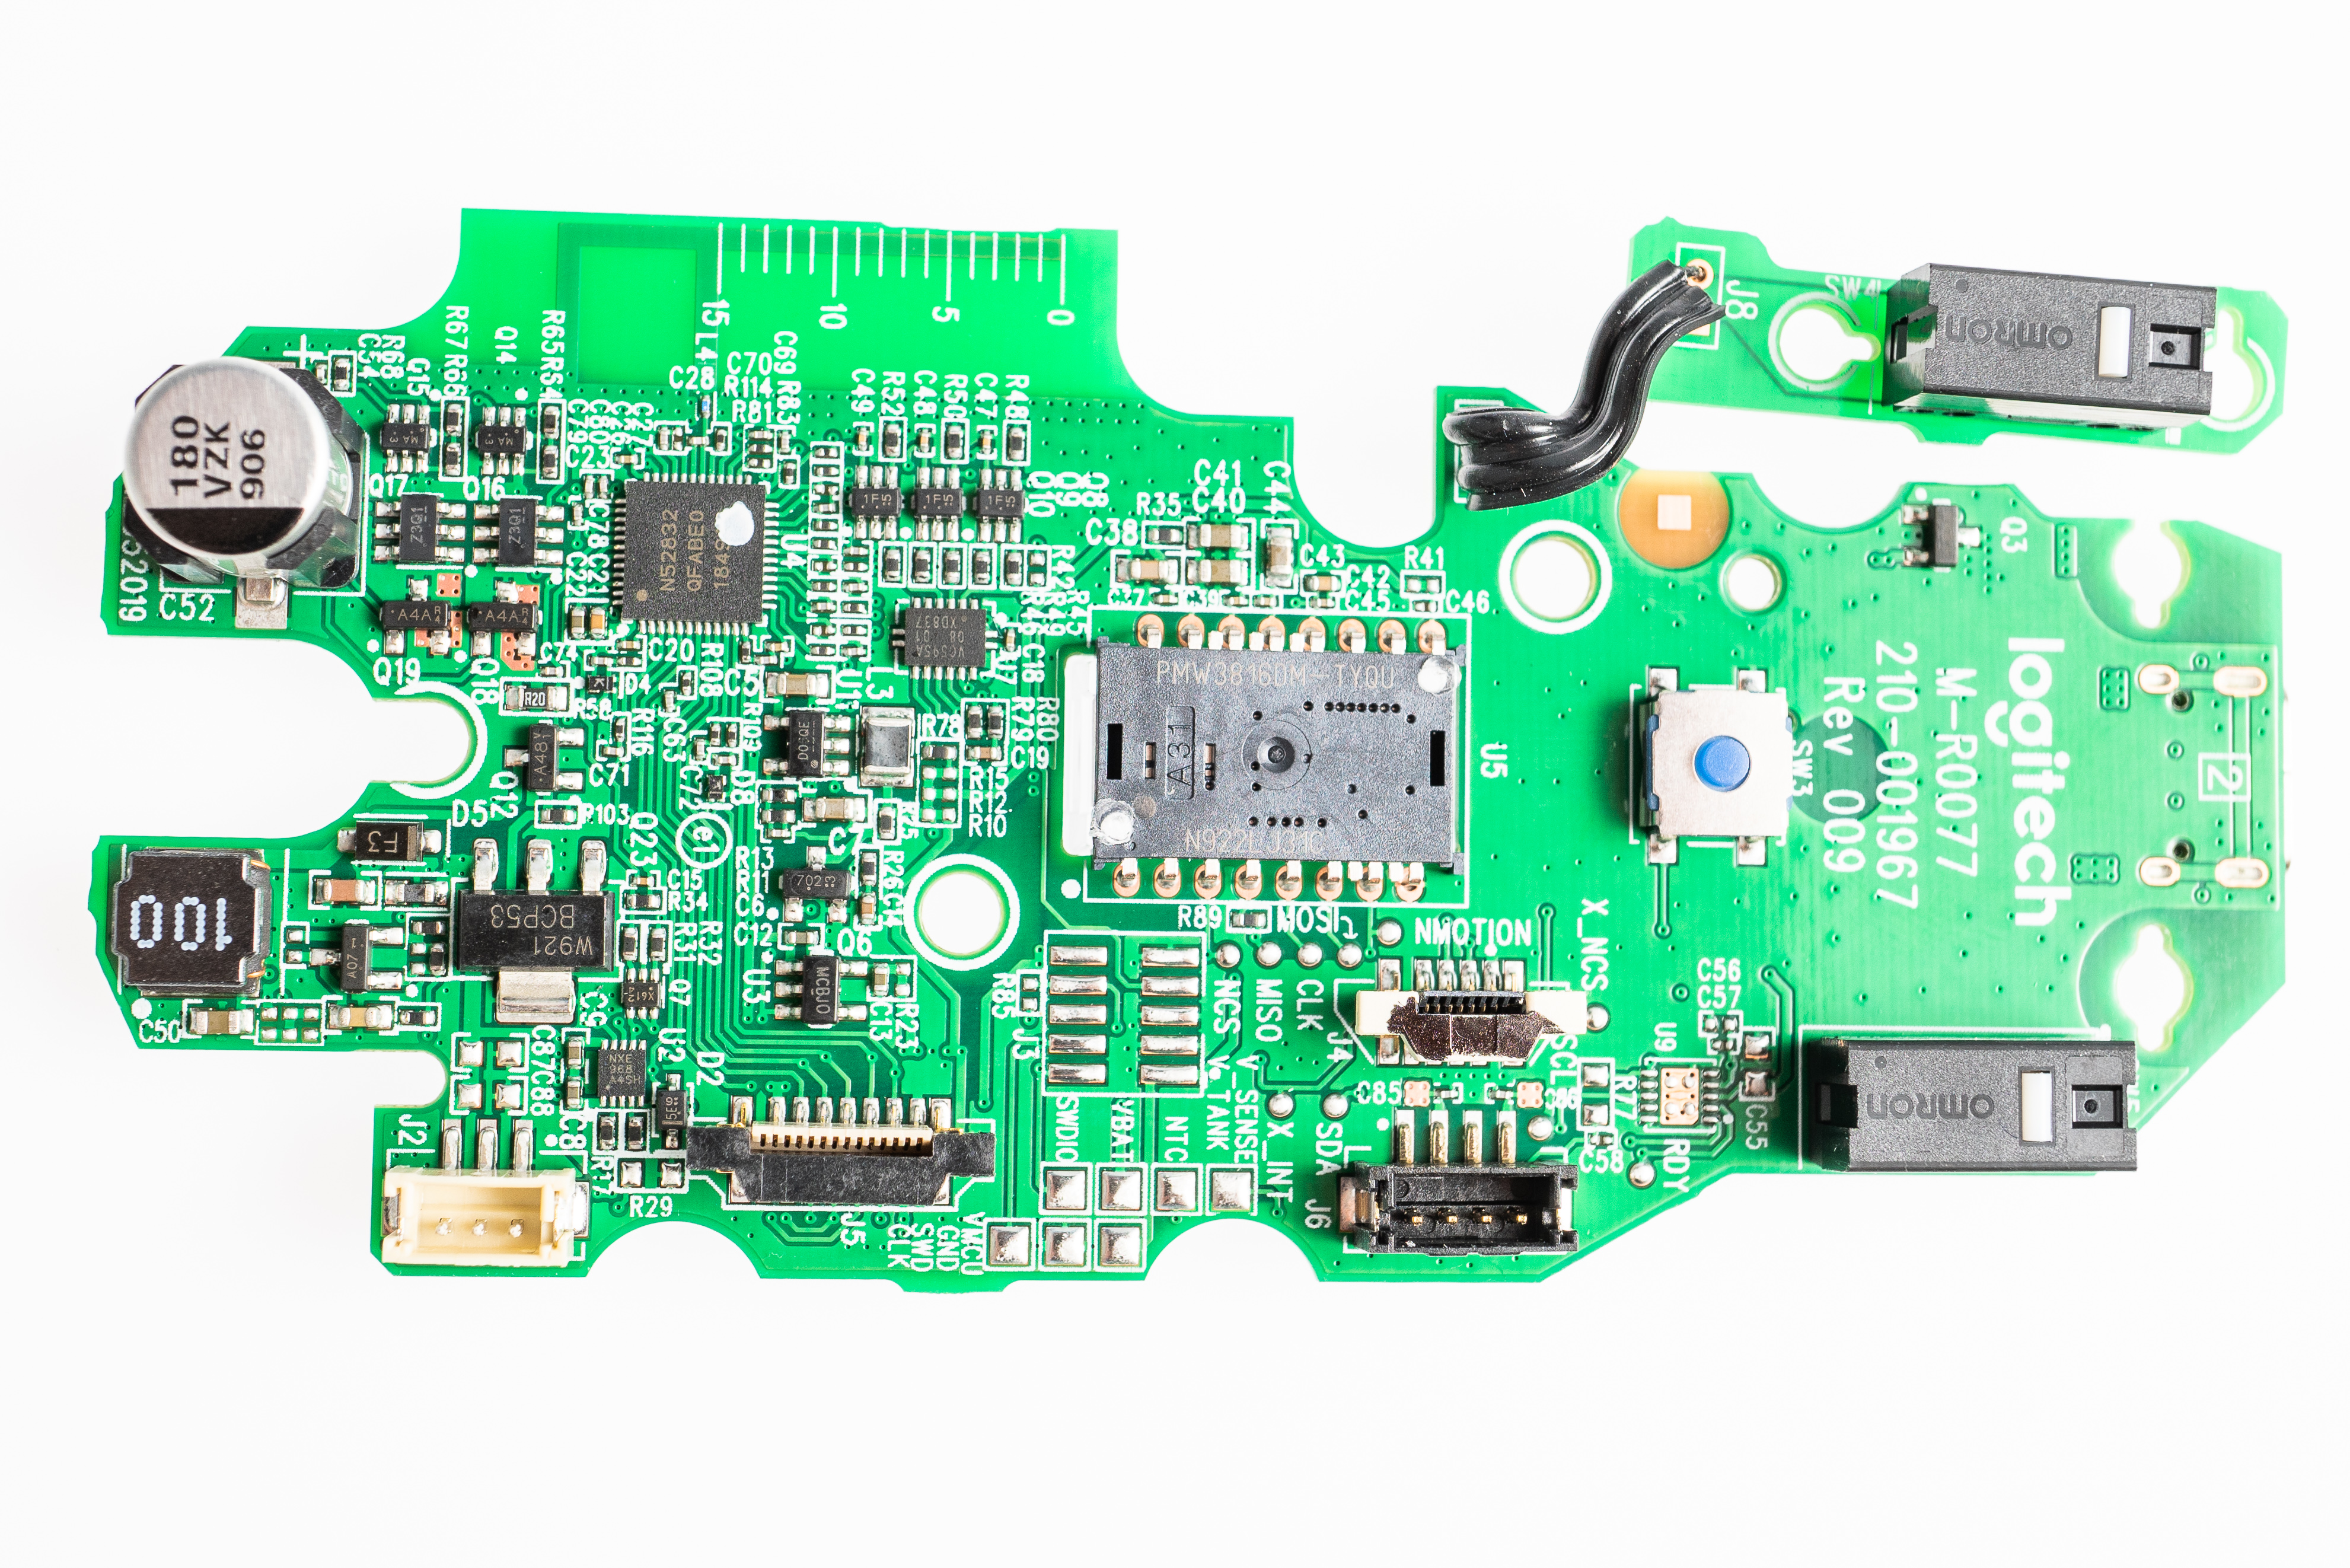
We can learn some things from examining the MX Master 3 electronics at the component level. First, the optical mouse sensor is the same (PMW3816DM). The number is formatted like a PixArt part number but isn’t listed on their website, so it may be a part they customized for Logitech. The bluetooth module has changed, from nRF51802 to nRF52832. This new generation of Nordic Semiconductor part supports Bluetooth 5 and has double the memory of the previous generation.
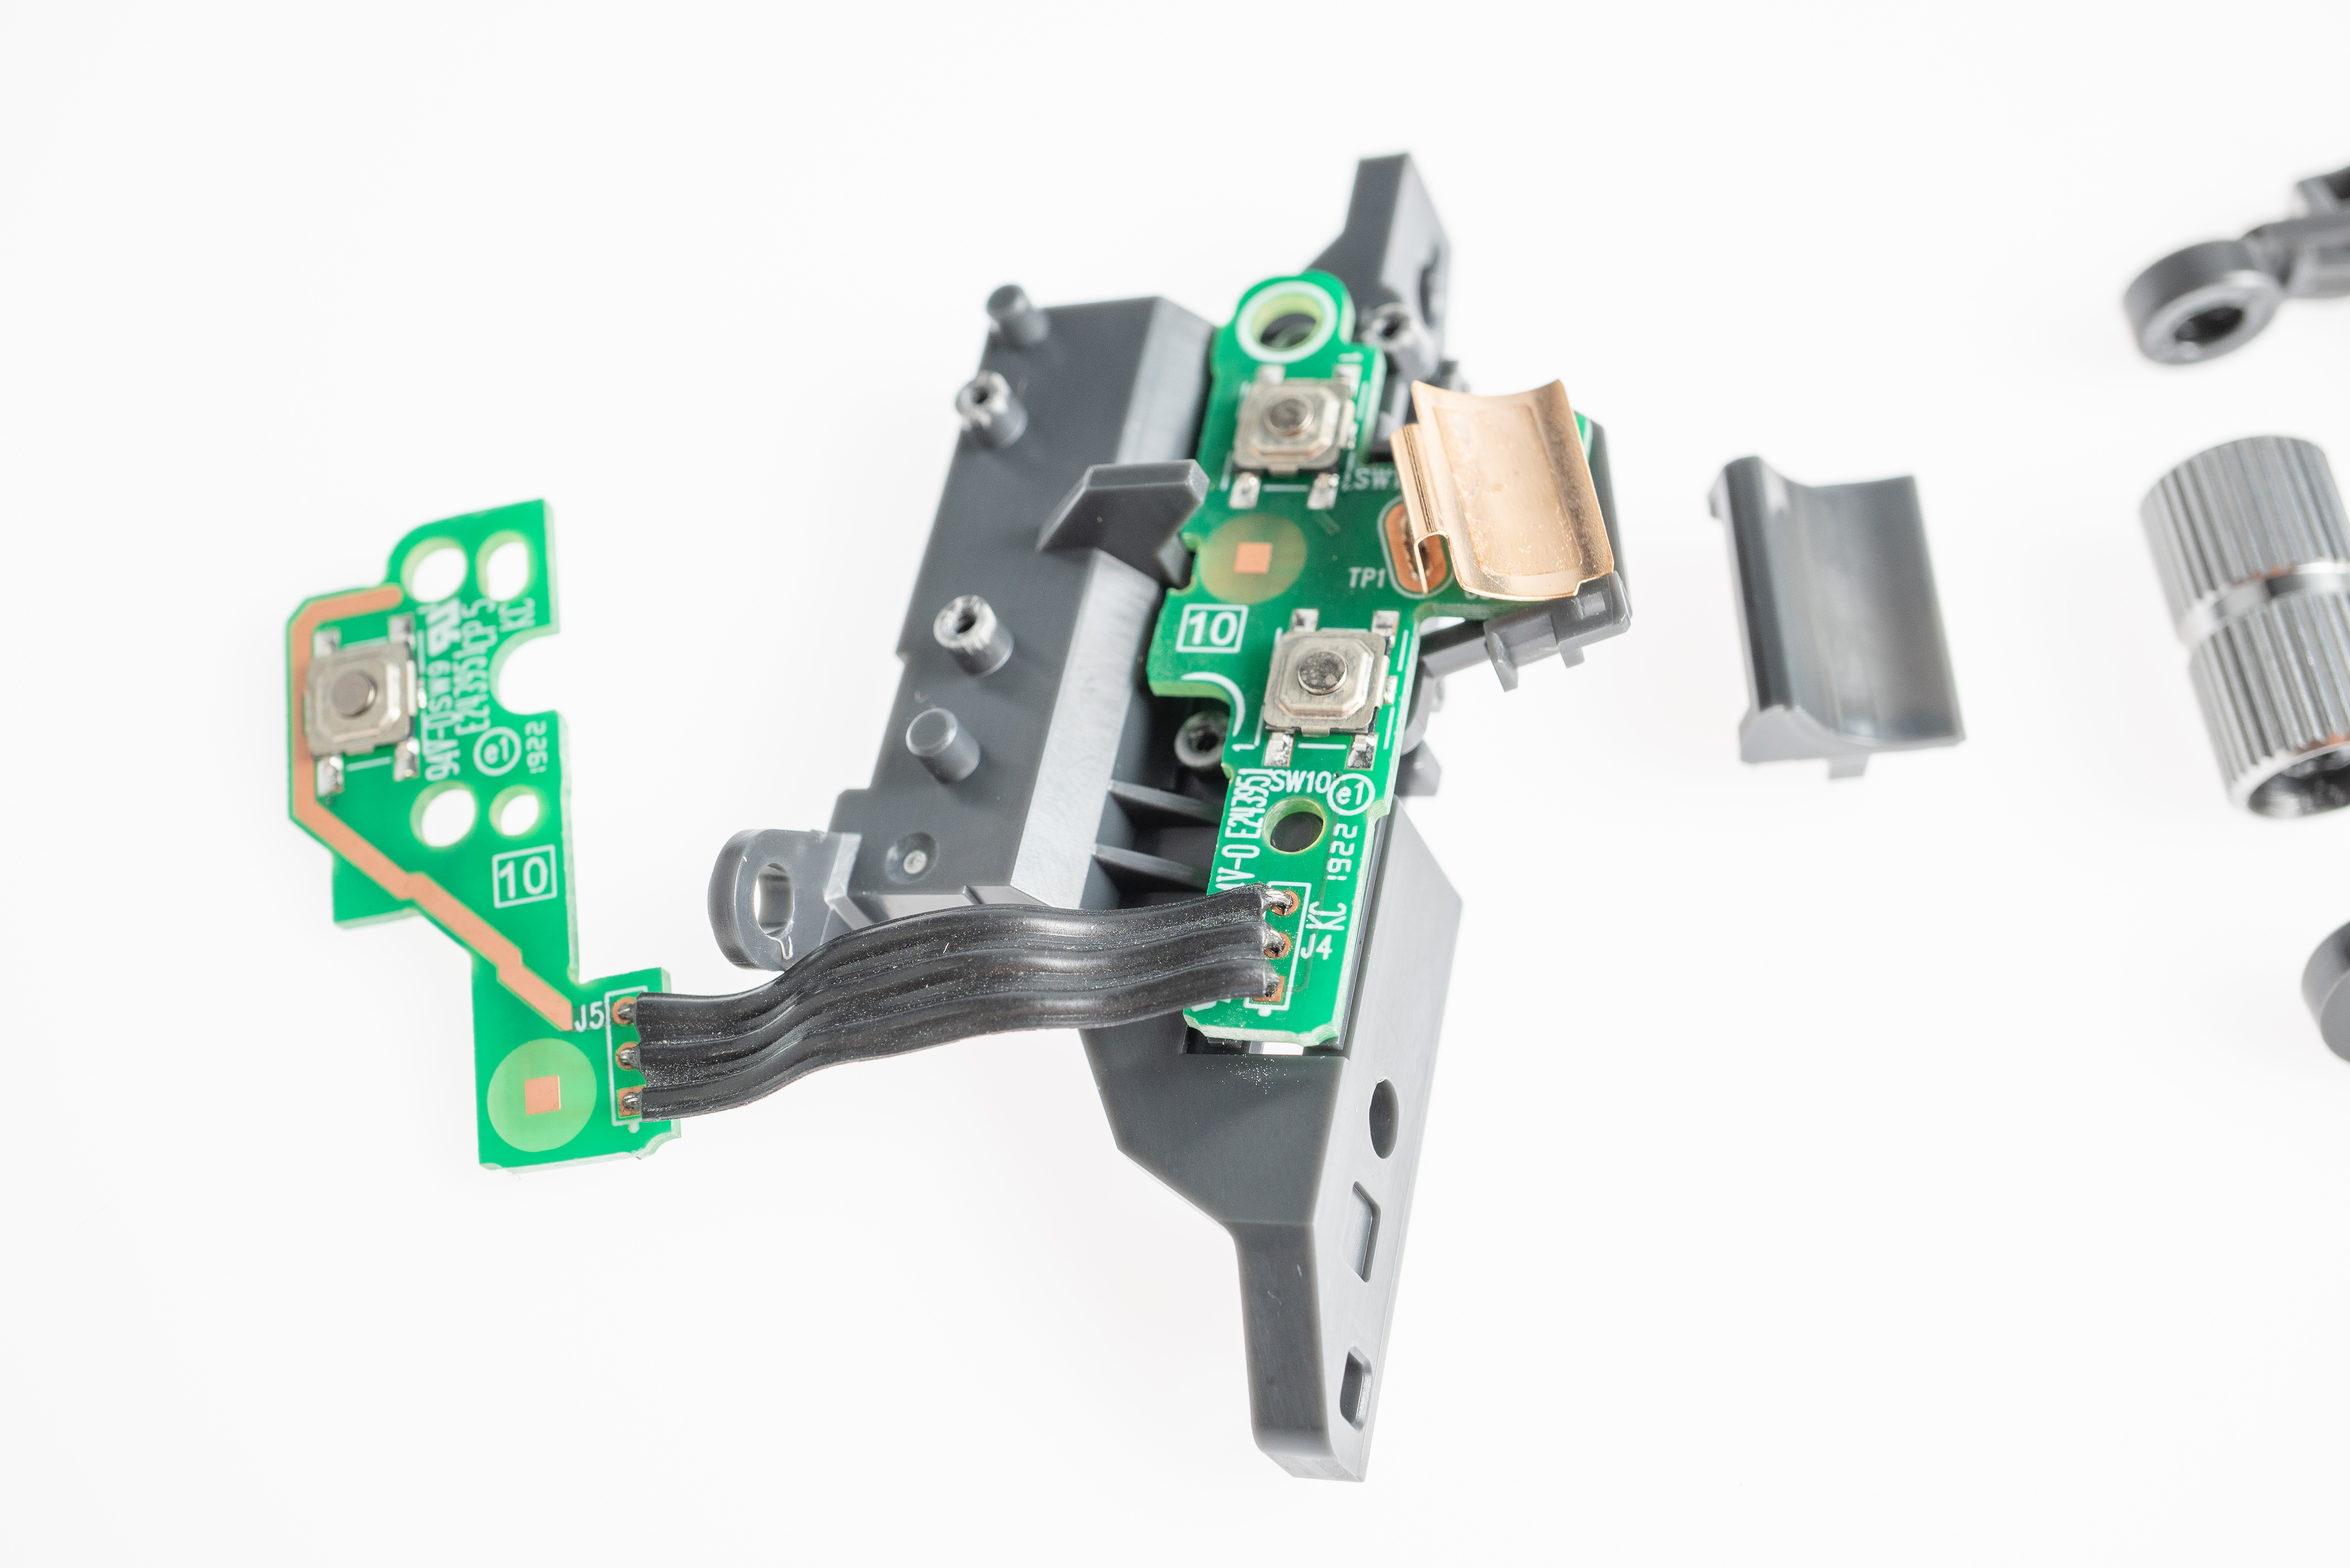
Logitech continues to impress with ESD mitigation strategies. There is a grounded metal tab under both of the thumb wheels. For the 3, with the addition of the Magwheel, the team included a ferrite bead around the wiring harness to prevent any unwanted discharge.

There are two interesting features of the MX Master 3 electronics that we haven’t seen elsewhere. First, the capacitor shown has a plastic cage around it. After some searching, it turns out that this is a standard part–it’s rated for high vibration (up to 30G) to prevent the component from shearing off during furious mouse-shaking. Another curious thing about this cap is its position: it’s charged to a high voltage and discharged into the magnet for polarity switches, so why place it so far from the scroll wheel? It’s possible that this area of the board is the only spot they could fit it under the plastic housing due to its size.
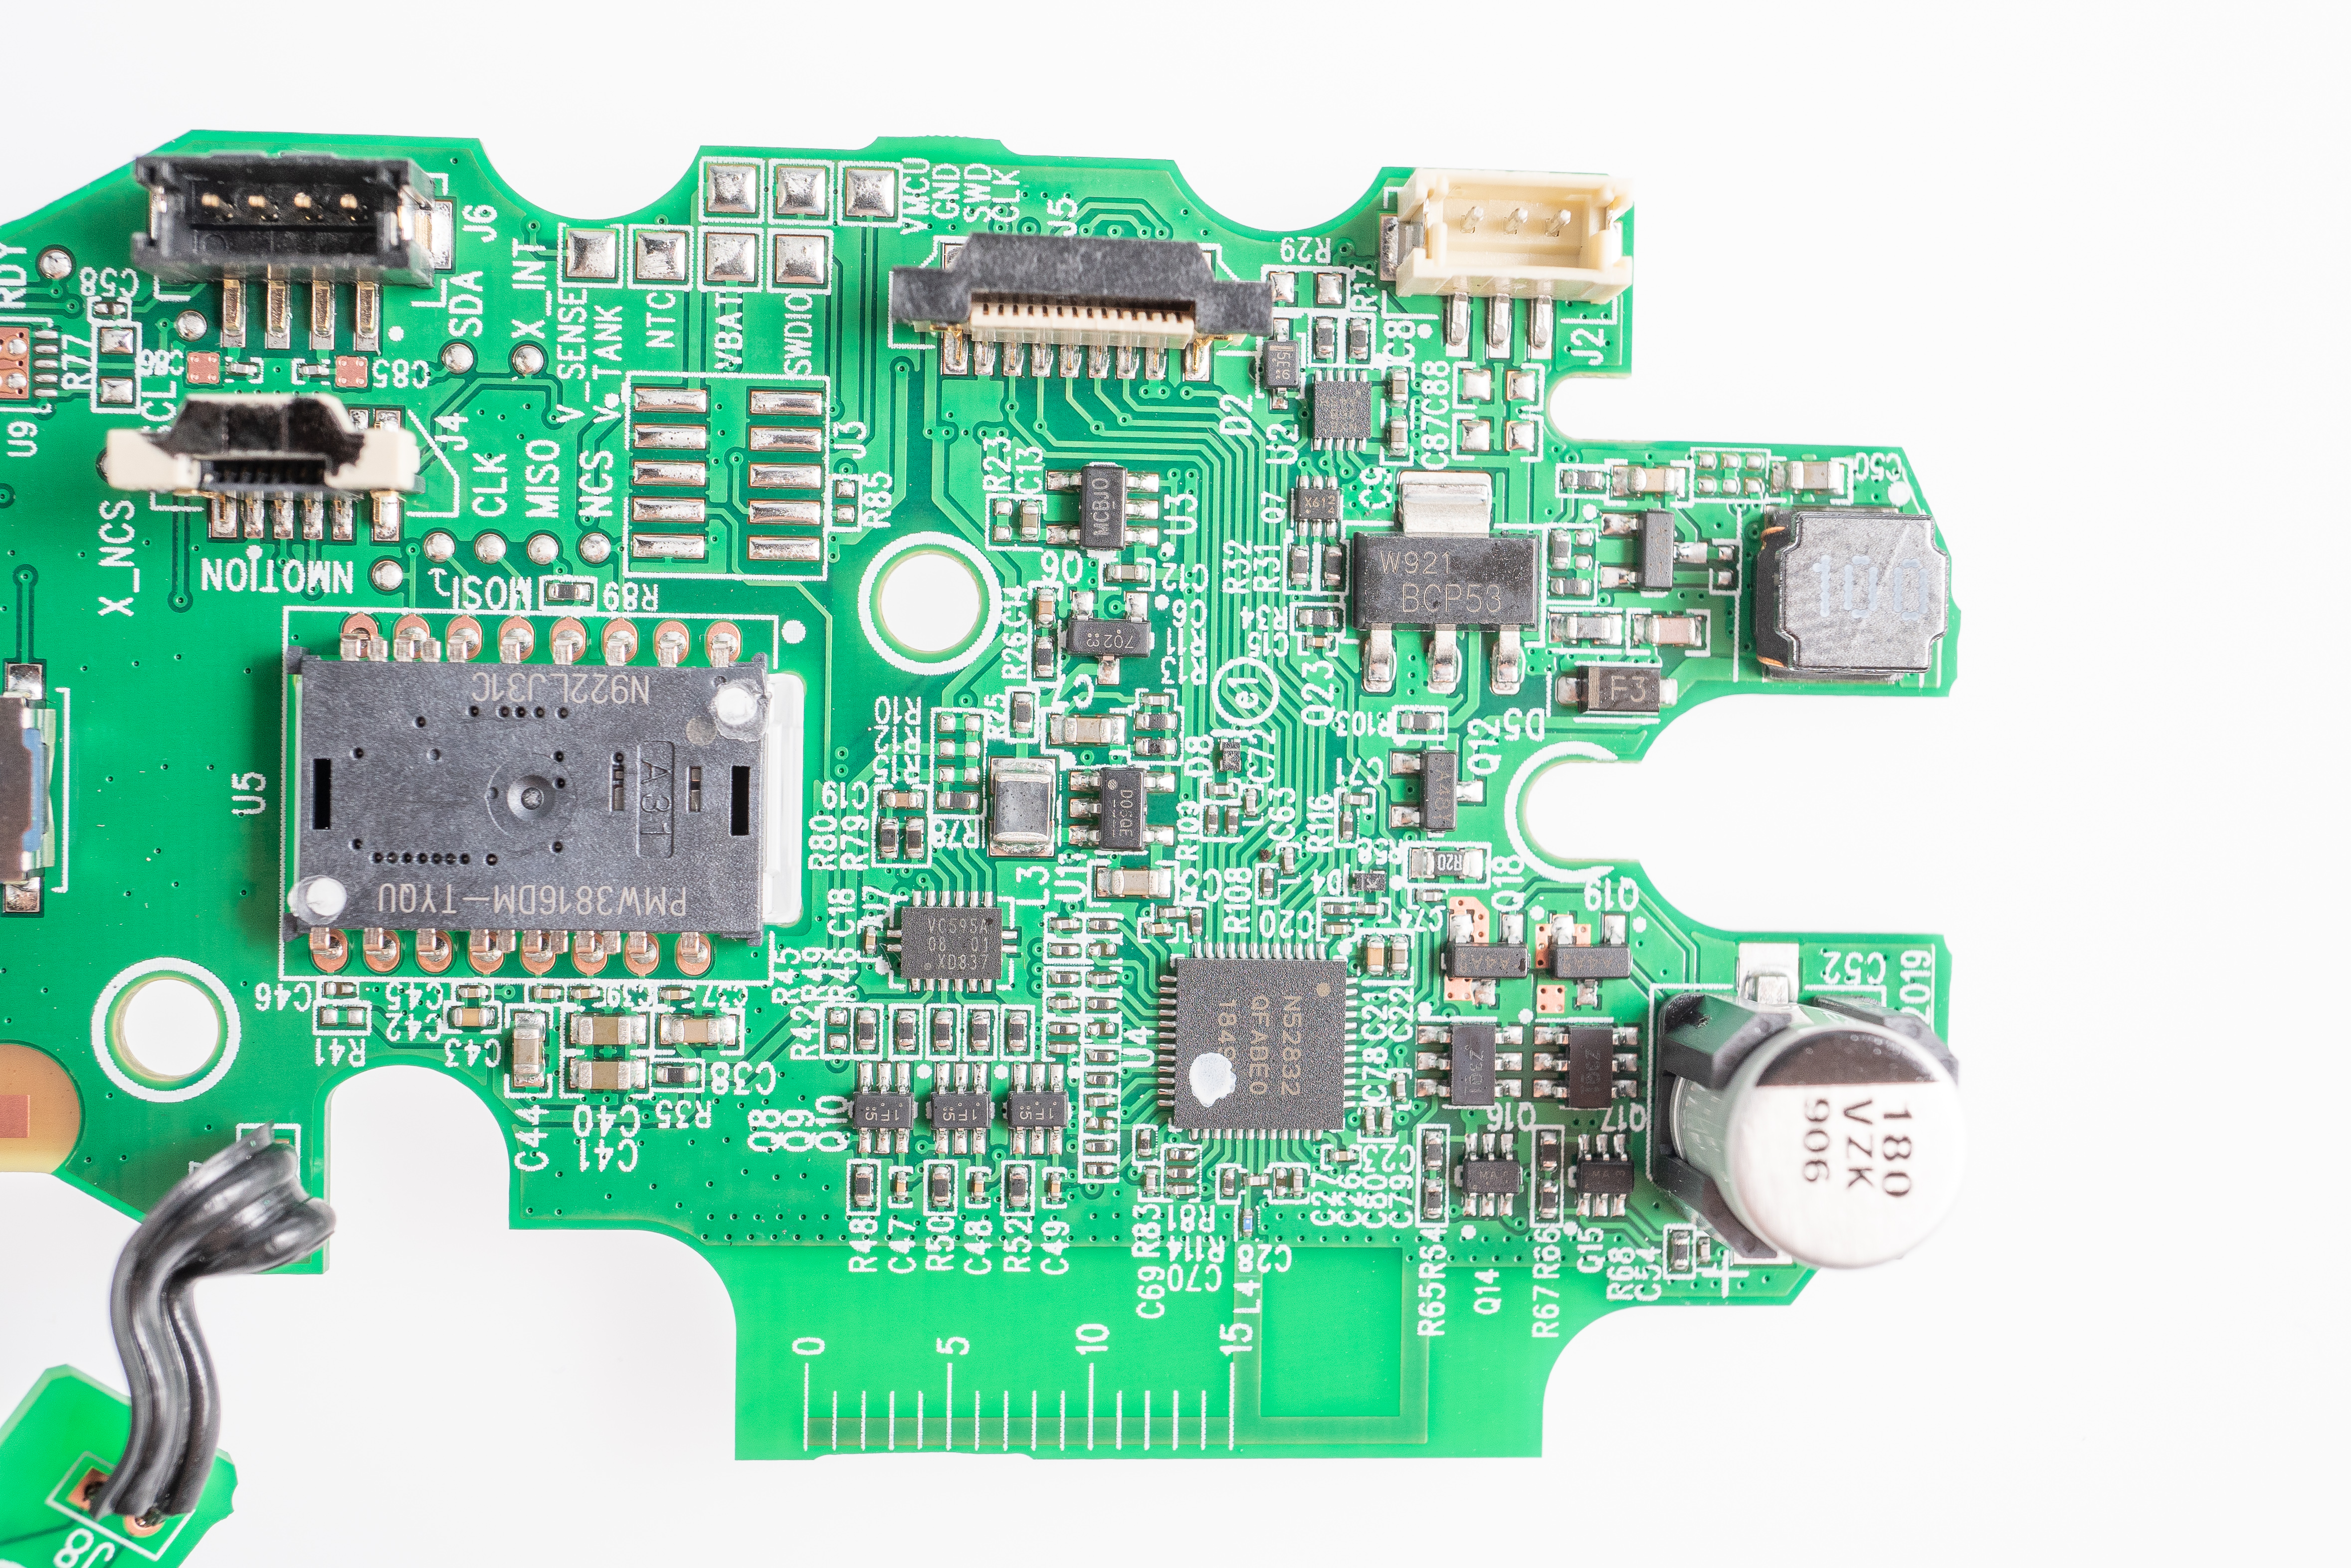
The other, and far more intriguing, feature we saw on the board is the centimeter scale silk-screened over the antenna trace. Our initial guess was that this has something to do with antenna tuning, but we’re unsure how it’s used. We first suspected that the board is tested on a fixture and then routed down to a specific level on the scale based on radio test results, but after further inspection we’re fairly sure this isn’t the case. The cutter marks visible here are similar to others around the board, which is consistent with de-panelizing the assembled board by router after SMT. If the cut were intended to tune the antenna, it should cut into the copper, which it doesn’t. In addition, when antennas are trimmed for tuning during R&D, the trimming is typically from the end, to change the length of the antenna, which also doesn’t match up here. Oh well, a mystery goes unsolved.. (let us know if you can help solve it).
Conclusion
Overall, we’re thoroughly impressed with both the use of the MX Master 3 and its internals. The improved mouse wheel is an impressive technological feat that proves Logitech’s obsession with constant improvement and maintaining a great user experience while reducing part count. The housings, flexures and the use of inserts to dial in button feel are examples of masterful mechanical design. And the electronics, despite dramatic changes in placement and board area, retain the reliability and fantastic tracking we’ve come to know and love in Logitech mice.
Special thanks to Haje for photography and editing help. He took far more photos than we can share in this post, so feel free to take a look at the (low-res, unedited) versions of them here.

Bolt invests at the intersection of the digital and physical world.